Creating a TeraByte Recovery Environment, WinRE Boot Disc, or UFD Containing Image for Windows (TBWinRE)
This tutorial is a guide to creating a WinPE boot disc or USB flash drive (based on the Windows Recovery Environment) containing Image for Windows. This tutorial also covers adding Image for Windows to the existing Windows Recovery Environment (WinRE) installed with Windows 7, Windows 8, Windows 10, and Windows 11.
Note: This tutorial covers using the TBWinPE/RE Builder Windows program. If you are using the TBWinRE.cmd script please click here to switch tutorials.
Requirements:
Before beginning, please review the following requirements for the project:
- Operating System:
Windows 7, Windows 8, Windows 8.1, Windows 10, or Windows 11. Both 32-bit and 64-bit versions are supported (Legacy BIOS and UEFI).
Note: The installed Recovery Environment needs to be functional for the program to update it. Creating the boot media may still be possible on a system with a non-functional Recovery Environment. Additionally, when creating the TBWinRE boot media it's recommended to do so on the system on which it will be used as some systems require files not available on all systems.
Note: Windows 11 24H2 or later running on an ARM64 system and a Windows 11 24H2 or later WinRE WIM are required to create a 64-bit ARM64 TBWinRE build.
- TBWinPE/RE Builder Files:
The TBWinPE/RE Builder files are installed automatically with Image for Windows (version 2.95 or later) and are located in the tbwinre folder in the Image for Windows installation folder. For example, on a default installation on a 64-bit system, the paths would be:
V3 & V4 installations: C:\Program Files (x86)\TeraByte Drive Image Backup and Restore Suite\tbwinre
V2 installation: C:\Program Files (x86)\TeraByte Unlimited\Image for Windows\V2\tbwinreNote: TBWinPE/RE Builder v1.38+ files are required for builds using Image for Windows V4. Earlier versions do not support V4.
-
If desired, this folder can be copied to a different location (e.g. D:\TBWinRE). Using a non-system folder will allow easier editing of the files when creating custom builds.
Alternatively, the TBWinPE/RE Builder files can be downloaded and extracted to a folder on the system you are using to create the build.
https://www.terabyteunlimited.com/downloads/wp/tbwinre.zip - Image for Windows:
Image for Windows 2.95 or later must be installed on the system which you are using to create the build. Using the most current version of Image for Windows is recommended.
Note: If using the trial version of Image for Windows V3 or V4 in the build it is necessary to run Image for Windows at least once before creating the build. Otherwise, the trial version will not be activated in the build.
Optional: The Image for Linux CD Boot files will be included if installed. The TBIView, TBIMount, TBIHD, and TeraByte OSD Tool Suite Pro (TBOSDTS) programs will also be included in the build if they are installed. Additionally, the standard TBOSDTS installed scripts and scripts in the public sub-folder will be included. TBOSDTS 1.47 or later is required to create the TBWinRE.bin boot file.
- Hard Drive Space:
Space required depends on build source (WinRE version) and build options. It is recommended to have at least 2GB of free space available. Additional space is required if creating the TBWinRE.bin boot file (approx. 500MB).
- Memory (RAM):
The target system requires a minimum of 512MB. Booting the TBWinRE build on a system with less than 512MB is not recommended or supported.
- Drivers:
Depending on the system, it may be necessary to add storage controller drivers to the build to have access to the drives when booted to TBWinRE. Examples of other drivers that may need added include USB 3 drivers and NIC drivers. Refer to Appendix 2, if necessary.
Note: Windows 8.x/10/11 include native support for USB 3 (adding USB 3 drivers is not necessary). Commonly used Windows 7 USB 3 drivers can be downloaded by TBWinPE/RE Builder and included in builds based on Windows 7.
Important Note for Systems using Drives Larger than 2.2TB: The versions of the Intel Rapid Storage Technology (RST) drivers included in the Windows 7 & 8 (8.0 version) WinRE do not properly support drives larger than 2.2TB. As a result, when this driver is used, the drive will be reported with an incorrect size (e.g. a 3TB drive showing as 746GB) and the file system on the drive may be corrupted. If using large drives on a system utilizing Intel RST it's strongly recommended to download the current driver and include it in the TBWinRE build. Go to the Intel Rapid Storage Technology (RST) page, click the driver link in the Latest Downloads section, then download either the f6flpy-x64.zip (for 64-bit Windows) or f6flpy-x86.zip (for 32-bit Windows) file. Note: If you must use an older version of the driver, version 10.1 is required for AHCI and version 10.5 is required for RAID.
Step 1: Download and Extract the TBWinPE/RE Builder Files
Note: If you are using the TBWinPE/RE Builder files installed with Image for Windows you can skip this step. If creating a customized build, you may find copying the files to an alternate folder (e.g. C:\TBWinRE) with standard user-level permissions will make the process easier.
The default installation path on 64-bit Windows is: C:\Program Files (x86)\TeraByte Drive Image Backup and Restore Suite\tbwinre
Download the TBWinRE ZIP file from the link below:
https://www.terabyteunlimited.com/downloads/wp/tbwinre.zip
The download will be in the form of a ZIP file containing the TBWinPE/RE Builder program, TBWinRE CMD script, and supporting files.
Important Note: Since this file comes from another computer, Windows may block it. Whether this happens or not depends on the version of Windows and the security settings. If the file is blocked, it won't work correctly. To check if the file is blocked, right-click on the downloaded file, select Properties from the pop-up menu, and see if an Unblock button or checkbox exists on the General tab. If it does, click the Unblock button or check the box, then click OK. An example of a blocked file is shown below:

Extract the contents of this file to the folder from where you want to run TBWinPE/RE Builder. It is recommended that you create a new folder in the root of a drive (C:\TBWinRE, D:\TBWinRE, etc.) and extract the files there.
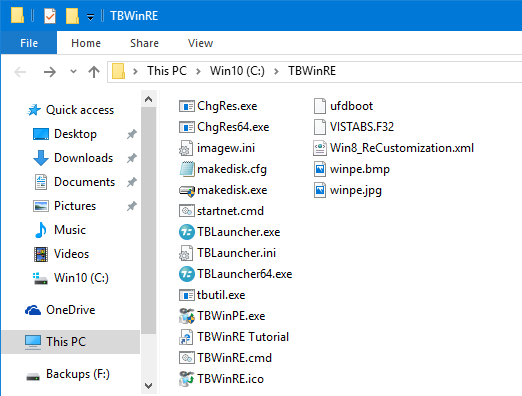
An example of the files extracted to the C:\TBWinRE folder is shown below:
Step 2: Running TBWinPE/RE Builder
The TBWinPE/RE Builder program can be run from Image for Windows, the installed shortcut, or directly from its folder:
- To run from Image for Windows V3 or V4:
Run Image for Windows, click the Utilities button, select the Create Image for Windows Boot Media option.
- To run from the installed shortcut:
Windows 7: Access the Windows Start menu and browse All Programs to the TeraByte Drive Image Backup and Restore Suite section. Then click the IFW-Create Recovery Boot Disk shortcut. If UAC is enabled (the default), click Yes at the UAC prompt to allow the program to run.
Windows 8: Access the Windows Start screen (e.g. press the Windows key or move mouse to lower-left corner of screen and click). Locate the section with the TeraByte program shortcuts and click IFW-Create Recovery Boot Disk (if the shortcut is not visible you may need to right-click a blank area of the screen and select All apps from the pop-up or just start typing the shortcut name). If UAC is enabled (the default), click Yes at the UAC prompt to allow the program to run.
Windows 10 & 11: Access the Windows Start menu (e.g. press the Windows key or click the Windows icon on the Taskbar). Click All apps, if necessary. Browse to locate the TeraByte Drive Image Backup and Restore Suite section (expand it, if necessary) and click IFW-Create Recovery Boot Disk. If UAC is enabled (the default), click Yes at the UAC prompt to allow the program to run.
- To run from the TBWinRE folder:
Browse to the TBWinRE folder. Double-click the TBWinPE.exe file or right-click on it and select Open from the pop-up menu. If UAC is enabled (the default), click Yes at the UAC prompt to allow the program to run.
The TBWinPE/RE Builder program will run and display the Welcome screen.

Click Next. The Project Type screen will be shown.

The TBWinRE project type is selected by default.
Note: Default settings will work for most standard builds. If you need to adjust the program or build settings click Settings. Details on the available settings can be found here.
Click Next. The License screen will be shown.

If necessary, enter your Image for Windows licensed name and product key. Leave the fields blank if using the trial version of Image for Windows. Enter the license information for the version of Image for Windows being included in the build. To skip this step in future builds if the format of the license information previously entered or imported appears valid, check the option. Click Next to continue.
Build requirements will be checked. If successful, the WinRE image file will be backed up and verified (assuming a current backup doesn't already exist).

Note: If the installed WinRE is selected as the source for the build (the default) and isn't found and no backup file is found, you can search the system for the WinRE file by clicking the Search for WinRE link (or go back and select the File | Search for WinRE... menu item). See Appendix 5 for details.
If no warnings are issued and no errors found the next screen will be displayed automatically. If there are errors or warnings (if not ignored) they will be displayed for review. To ignore warnings in the future check the Ignore warnings when checking requirements option. Click Next to continue.
By default, if the build is based on Windows 7 (Windows 7 WinRE, in this case) and the USB 3 drivers aren't found you will be prompted to download them. It is recommended to include these drivers to support systems with USB 3. Click Download to start the process. Once downloaded, the license agreements will be displayed. Click to accept the licenses and then click OK to use the drivers.

Click Next to continue. The Build Type screen will be shown.

Select the desired build type to create. Options will be disabled if not supported.
The following build types are available:
Create a TBWinRE CD, USB Flash Drive (UFD) or ISO file: Select this to create a bootable CD, UFD, or ISO file containing TBWinRE. The installed WinRE will not be modified.
Modify the installed Windows Recovery Environment (WinRE): Select this to modify the installed WinRE to include the TeraByte programs. The WinRE is accessed from the Windows Advanced Boot Options menu (via F8 when booting Windows 7) or the Boot/Restart menu (Windows 8 or later). The status of the installed WinRE will be shown by default, if available (can be disabled in Settings). Note: The installed WinRE must be functional and used as the source for the build for this option to be available.
Restore the original Windows Recovery Environment (WinRE): Select this to restore the Windows Recovery Environment (WinRE) back to its original state. When a build is created, a backup is automatically created in the WinRE_Backup folder if one does not exist. Note: This option is not available if a backup does not exist. Additionally, the installed WinRE must be functional for this option to be available.
Create boot file TBWinRE.bin for use with TeraByte's BOOTFILE program: Select to create the TBWinRE.bin boot file for use with TeraByte's BOOTFILE program (supports booting directly to the file from Windows).
Create TBWinRE WIM for use with Image for Windows Reboot: Select to create either the IFW WinRE or IFW BootWIM build for use with the Image for Windows Reboot feature (the currently selected mode is shown). These are custom TBWinRE builds designed to be booted directly from Image for Windows to perform an automated operation outside of Windows. IFW WinRE updates the installed WinRE to a TBWinRE build (may be minimal if free space is low), while IFW BootWIM is a full TBWinRE build saved in Builder's folder. In most use cases, it is not necessary to manually create these builds as they are created and updated automatically as needed. Note: This option is disabled if build requirements failed. For IFW WinRE mode, the installed WinRE must be functional.
Select the desired build option and click Next to continue.
If plugins are enabled to be included in the build, the Plugins screen will be shown next and plugin requirements will be checked. This step will continue automatically if there are no warnings or errors. Otherwise, click Next to continue.

The Build Summary screen will be shown.

At this point you can either create the build by clicking Start or go back if you need to make changes.
The build process may take several minutes, depending on the speed of the computer.

Note: When the build's WIM file is being unmounted it may take several minutes. Some anti-virus programs may cause a slow unmount or an unmount error. If the unmount fails you will be prompted to try it again.
TBWinPE/RE Builder will stop if it encounters an error during the build process. A log file (TBWinPE.log) is also created by default and can be examined if there are issues (select View Log from the Help menu).
When the build has completed, if creating a TBWinRE CD, USB flash drive (UFD), or ISO file, click Finish to launch TeraByte's MakeDisk utility to create the desired TBWinRE boot media. Otherwise, just exit the program.
Note: If you have existing TBWinPE/RE boot media you wish to update, but don't want the media reformatted by MakeDisk (existing files would be lost), please refer to the following KB article: Manually Updating the TBWinPE/RE Boot Media


Click Next to start the process and then select the bootable media type you want to create. In the example below, a USB flash drive is selected.

Important: When creating a TBWinRE bootable USB flash drive (UFD), it's recommended to use a Partition USB Layout option (e.g. Partition - MBR FAT/FAT32 Partition). Using the No Partition mode may not allow the drive to boot correctly. For more information on the USB Layout options or if you have problems booting the UFD, please see this KB article:
Using a UFD (USB Flash Drive) as installation/boot media for TeraByte Unlimited products.
Click Finish to create the bootable media. If you wish to create another boot media (e.g. you created a CD and also want a UFD), you can run MakeDisk from the TBWinRE folder (it's not necessary to recreate the build unless you've updated the installed TeraByte programs or the TBWinPE/RE Builder files).
Step 3: Using TBWinRE
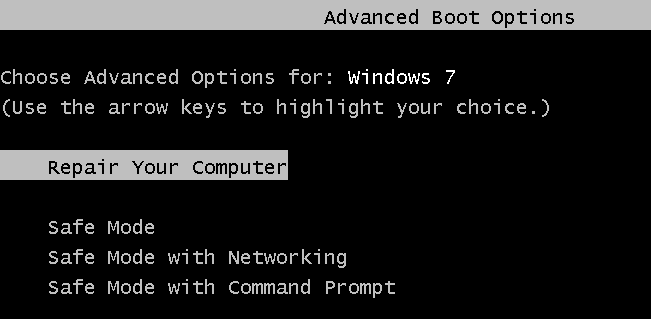
If you modified the installed Windows 7 Recovery Environment (WinRE), you can boot into it by using the Windows Advanced Boot Options menu accessed via F8 when booting Windows. Select the Repair Your Computer option.
If you modified the installed Windows 8 Recovery Environment (WinRE), you can boot into it by restarting into the recovery environment (e.g. press WinKey+I, click Power, hold down Shift and click Restart, click Troubleshoot).
If you modified the installed Windows 10 or Windows 11 Recovery Environment (WinRE), you can boot into it by restarting into the recovery environment (e.g. press the Windows key, click Power, hold down Shift and click Restart, click Troubleshoot).
If the program was able to integrate Image for Windows into the menu you can select it in the Troubleshoot section. Otherwise, select Advanced options and then the Command Prompt. Image for Windows will be run by default and you can access the other Windows options by running the System Recovery Options program from TBLauncher.

If using the TBWinRE boot media, boot to either the TBWinRE CD or the TBWinRE UFD. Booting on both Legacy BIOS and UEFI systems is supported.
Booting into TBWinRE may take several minutes, depending on the system, startup options selected, and boot media type.
The TBWinRE desktop will look similar to the screenshots below. Please note that this type of build is a relatively plain WinRE build and does not include a taskbar or Windows-type shell. TBLauncher can be used to easily run the included programs or shut down or restart the system.
Depending on the mode set for TBLauncher and the version of Windows, either the System Recovery Options program or Image for Windows will be run automatically.
The screenshot below shows TBLauncher set to WinPE mode (the default). The System Recovery Options program can be run from TBLauncher if it's needed.

The screenshot below shows TBLauncher set to WinRE mode (built using the Windows 7 RE). Note that when the System Recovery Options program runs you may need to enter your Windows user name and password and it may scan for compatible versions of Windows.

To exit TBWinRE, remove the TBWinRE boot media (if using a CD or UFD) and click either the Shut down or Restart button in TBLauncher.
Note: Some systems using the Windows 8 WinRE may exhibit a delay when shutting down or restarting. If this happens you can hold down the Shift key when clicking the button to force the action.
The TeraByte programs included in the build can be also run from a Command Prompt window by typing the program name and pressing ENTER: imagew, tbiview, tbimount, tbosdtw, tbihd
Appendix 1 - Using Custom Settings
By default, TBWinPE/RE Builder expects the TeraByte programs to be at their installed/default locations. If any of these programs are not installed or are not found automatically you will need to set the correct paths.
Details on settings and options available for the build can be found in Settings.
Appendix 2 - Adding Windows Drivers
Windows Drivers can be added to the build by placing them into the Drivers folder located in the build folder. In this example, which is using a custom C:\TBWinRE build folder, the Drivers folder is C:\TBWinRE\Drivers.
Important: If you are running TBWinPE/RE Builder from an Image for Windows installation, the Drivers folder would be at one of the following locations (assuming the default installation path was used):
In 32-bit Windows: C:\Program Files\TeraByte Drive Image Backup and Restore Suite\tbwinre\Drivers
In 64-bit Windows: C:\Program Files (x86)\TeraByte Drive Image Backup and Restore Suite\tbwinre\Drivers
To easily open the correct folder for adding drivers:
- Run TBWinPE/RE Builder.
- Do one of the following:
- Click Next > and then click the Settings... button
- Open the File menu and select Settings...
- In Settings, select the Build Options tab.
- In the Options section, following the Add drivers from "Drivers" folder option, click the Open drivers folder link.
- The Drivers folder will open in Windows File Explorer.

The Drivers folder will be searched for drivers when the build is being created. Placing the files for each added driver into their own folder is usually the simplest method. For example, if you're creating the TBWinRE build on Windows 7 and need to add 64-bit USB 3.0 drivers, you might place the driver files into C:\TBWinRE\Drivers\usb3x64 (as shown below):

Drivers must be of the INF type (.inf) and all supporting files (.cat, .pnf, .sys, .oem, .dll, etc.) must be included. All driver related files and sub-folders should be in the same folder with the .inf file. In most cases, the driver files are packaged together in a folder and you can just copy that folder into the Drivers folder (this will copy all the files and any sub-folders).
Windows installer (e.g. .msi files) or other driver package types (like .exe files) are not supported. In addition, INF files that are not valid driver packages will be ignored.
Important: Drivers must be correct for the architecture of WinRE being used (32-bit or 64-bit). In most cases, this means that if you're building on a 32-bit version of Windows, use 32-bit drivers; if building on a 64-bit version of Windows, use 64-bit drivers. However, if a user selected WinRE WIM is used as the source for the build you need to use drivers that match the architecture of that WIM.
Additionally, the drivers should be correct for the Windows version of WinRE used for the build (e.g. use Windows 10 drivers if building using the Windows 10 WinRE).
Appendix 3 - The "WinRE_Backup" Folder and Other Build Folders
The WinRE_Backup folder will be created in the TBWinRE folder during the building process. It contains a backup of the original winre.wim file found on the system. It is recommended that you keep this backup in case it's needed later. This folder may also contain other WinRE WIM files, such as those copied or selected for use when searching the system for WinRE.
The ISO folder contains the files needed to create the TBWinRE CD, UFD, or ISO file. If desired, this folder can be deleted after the build has completed and the boot media has been created. However, if you don't delete this folder you can create (or recreate) the boot media any time by running MakeDisk from the TBWinRE folder (it's not necessary to recreate the build unless you've updated the installed TeraByte programs or the TBWinPE/RE Builder files).
The build folder is used to hold the copy of the winre.wim file during the build process. This folder is removed when the build completes.
The mount folder is used to mount the winre.wim file being modified.
The config folder contains the configuration files used by TBWinPE/RE Builder.
The Plugins folder contains the plugins and associated files used by TBWinPE/RE Builder.
The Drivers_Win7PEUSB3 folder contains the downloaded USB 3 drivers for builds based on Windows 7.
The Extract_WinRE folder is used when extracting the WinRE WIM file from a Windows installation ISO (or install.wim/.esd file). The extracted WIM will also be located in this folder if the operation was successful.
The ADK_Install folder contains the ADK installer programs and logs created when the Windows ADK is installed using TBWinPE/RE Builder.
Appendix 4 - Directly Booting TBWinPE/RE WIM File in Windows 7 or Later
TBWinPE/RE Builder can configure Windows to directly boot the WIM file from a standard TBWinPE or TBWinRE build when using Windows 7 or later. This allows booting into the TBWinPE/RE environment with a simple restart of Windows with no boot media required.
Note: When creating a TBWinPE/RE WIM to boot it's recommended to use a standard boot media build type (e.g. TBWinRE CD/UFD/ISO option). If just creating the WIM for booting it's not necessary to create the boot media when the build finishes - the WIM file (boot.wim) is located in the build's ISO\sources folder.
Booting a WIM File
Run TBWinPE/RE Builder, select the File menu and then the Boot WIM file... item. Select the WIM file you want to boot. The WIM file can be a standard WIM or a TBWinPE/RE WIM (recommended).

If booting a TBWinPE/RE WIM file, you can optionally select a Run script or command file. The Run file can be a .cmd/.tbs/.run script or a text file (.txt/.ifw) with command line parameters for IFW. The file must be located on a partition accessible when booted to TBWinPE/RE. To specify a script file that is internal to the WIM, click on Additional options and enable the Run file exists in WIM option, then type in the full path to the WIM, starting at root (e.g. \myscripts\backup.ifw). Using a Run file requires a TBWinPE/RE WIM configured to use TBLauncher v1.13+ (TBLauncher is used by default in these builds).
Keep in mind that when a Run file is specified that it will replace any TBLauncher auto-run option configured in the WIM when it was created. For example, if you had configured TBLauncher to run a RunScript.cmd file on startup, that script will not be run. However, if the InitScript.cmd script was configured it will still be run prior to the specified script.
With IFW 3.17+ you can easily create .cmd/.tbs/.ifw files for use with BOOTWIM. To do this, run IFW, go into Settings and enable the Show Save for TBWinPE on Summary option (General tab). Next, proceed through the operation steps normally. Finally, on the Summary step, click the Save for TBWinPE button. The extension you use for the filename will determine the output saved to the file. Additionally, the Disk ID will be used in the output even if that option is not enabled in Settings.
If you want to use a custom IFW.INI file for the BootWIM operation you can place the file in either the WIM's folder or the Run file's folder and it will be copied in before running Image for Windows.
Clear booting of WIM on next restart: If a WIM was previously configured to boot and the system was not restarted you can click this link to clear it.
Remove BOOTWIM BCD entries: Click to remove TBWinPE BOOTWIM entries from the BCD and clear booting of WIM on next restart if configured.
Additional options: Click this link (or right-click in the dialog) to display a pop-up menu with the following additional options:
- Clear WIM file: Clears the current WIM file selection.
- Show WIM details: Displays available information on the selected WIM file. Some older TBWinPE/RE WIM files may not have version information (requires Windows 8 or later).
- Clear Run file: Clears the current Run file selection.
- Open Run file in Notepad: Opens the Run file in Notepad for easy viewing or editing of the commands/parameters.
- Run file exists in WIM: Enable to allow entering the path to a Run file internal to the WIM.
- Prompt to restart: If enabled there won't be a prompt to restart after you click to boot the WIM.
- Force restart: Force system to restart. This may cause data loss if you have unsaved files.
- Ignore drive type: Allow unsupported drive types.
- Match Windows drive letters: Attempts to match the Windows drive letter assignments during initialization after booting the WIM. Note that some drives, especially non-fixed types, may still be assigned different letters. Additionally, some drives may not be assigned if the Windows partition is not accessible after booting (e.g. encrypted) and may require manually assigning letters. This option requires a TBWinRE/PE WIM configured to use TBLauncher v1.21+ (TBLauncher is used by default in these builds).
- Use BCD HIGHESTMODE option: Enable to use the BCD HIGHESTMODE option when booting a WIM file. This may help on some systems to use a higher or full resolution instead of being limited to 1024x768 or some other lower resolution.
Booting a WIM File from the Command Line
To utilize this feature, run TBWinPE/RE Builder (TBWinPE.exe) from the command line and specify the /bootwim parameter. Usage information is detailed below.
BOOTWIM Command Usage
/bootwim wim_path [ /run script_file ] [ /noboot ] [ /quiet ] [ /force [ delay ] ] [ /idt ] [ /mdl ] [ /dfw ] [ /ini [section,]name=data ]
/bootwim /reset
/bootwim /remove
/bootwim /?
Boots the WIM file specified by wim_path. If path or filename includes spaces, surround with quotes. WIM path can be relative or absolute and can use a drive letter or volume GUID. The location of the WIM file cannot be read-only as several support files must be created in the WIM file's folder.
run - Runs the specified script or command file after booting. If path or filename includes spaces, surround with quotes. script_file can be a .cmd/.tbs/.run script or a text file (.txt/.ifw) with command line parameters for IFW. The file must be located on a partition accessible when booted to TBWinPE/RE. To specify a script file that is internal to the WIM, preface the path with [WIM] instead of a drive letter (full path must be used, starting at root). This option requires a TBWinPE/RE WIM configured to use TBLauncher v1.13+ (TBLauncher is used by default in these builds).
Keep in mind that when a script is specified to run that it will replace any TBLauncher auto-run option configured in the WIM when it was created. For example, if you had configured TBLauncher to run a RunScript.cmd file on startup, that script will not be run. However, if the InitScript.cmd script was configured it will still be run prior to the specified script.
With IFW 3.17+ you can easily create .cmd/.tbs/.ifw files for use with BOOTWIM. To do this, run IFW, go into Settings and enable the Show Save for TBWinPE on Summary option (General tab). Next, proceed through the operation steps normally. Finally, on the Summary step, click the Save for TBWinPE button. The extension you use for the filename will determine the output saved to the file. Additionally, the Disk ID will be used in the output even if that option is not enabled in Settings.
If you want to use a custom IFW.INI file for the BootWIM operation you can place the file in either the WIM's folder or the Run file's folder and it will be copied in before running Image for Windows.
noboot - Don't restart the system after configuring to boot WIM.
quiet - Don't display messages or prompt to restart.
force - Force system to restart. Applications with unsaved data will be forcibly closed, which may result in data loss. If a delay value (5 to 120 seconds) is specified the Windows shutdown message will be displayed.
idt - Ignore drive type (allow unsupported drive types).
mdl - Attempts to match the Windows drive letter assignments during initialization after booting the WIM. Note that some drives, especially non-fixed types, may still be assigned different letters. Additionally, some drives may not be assigned if the Windows partition is not accessible after booting (e.g. encrypted) and may require manually assigning letters. This option requires a TBWinRE/PE WIM configured to use TBLauncher v1.21+ (TBLauncher is used by default in these builds).
dfw - Disable Windows firewall. This is required to use multicasting. This option requires a TBWinRE/PE WIM configured to use TBLauncher v1.35 (or newer).
ini - Specify TBLauncher INI file option to set on startup. Surround with quotes if any value contains spaces. This option can be specified multiple times.
section - Section name. The 'Options' section will be used if not specified.
name - Name of option to set.
data - Data value for option.
Example: /ini Log=1 /ini Style=1 /ini "Menu,DisplayCount=12"
This option requires a TBWinRE/PE WIM configured to use TBLauncher v1.35 (or newer). Depending on the mode used to boot the WIM, some options may not be overridden.
reset - Clears booting of WIM on next restart.
remove - Removes TBWinPE BOOTWIM entries from BCD and clears booting of WIM on next restart if configured.
? - Displays usage information.
Examples:
tbwinpe.exe /bootwim custom.wim /force
- Will configure the system to boot custom.wim, prompt user to restart, and force a restart.
tbwinpe.exe /bootwim offline.wim /run backup-c.txt /quiet
- Will configure the system to boot offline.wim and run IFW using the command line parameters in backup-c.txt. User will not be prompted to restart.
- Keep in mind that any scripts or IFW command files should reference disks and partitions as they will be when booted to TBWinPE/RE, which can be different from normal Windows. For example, backup-c.txt uses the GUID values instead of drive letters:
/b /d:{6DC69B20-2C93-40AE-AE07-B3025C4E29D8}@0x4 /f:{363CA4D2-9012-47E0-A1B3-852AD9C4A27A}@0x2:"\Win10 Drive C" /v /desc:"Backup of Win10 partition" /hash
tbwinpe.exe /bootwim "\\?\Volume{3cdba6bf-0c87-993e-6bde-77590f490200}\IFW Offline\boot.wim"
- Will configure the system to boot boot.wim using the volume GUID (no drive letter assigned) and prompt the user to restart.
tbwinpe.exe /bootwim iso\sources\boot.wim /run [WIM]\myscripts\backupwin10.cmd
- Will configure the system to boot boot.wim and run the backupwin10.cmd script, which is included in the WIM in the \myscripts folder.
Manually Booting IFW WinRE and IFW BootWIM Builds
IFW WinRE and IFW BootWIM are custom TBWinRE builds designed to be booted directly from Image for Windows to perform an automated operation outside of Windows. IFW WinRE updates the installed WinRE to a minimal TBWinRE build, while IFW BootWIM is a full TBWinRE build saved in Builder's folder. While these builds are designed to be managed automatically, advanced users may wish to use them for performing imaging operations outside of Windows without needing to manually configure a normal BootWIM setup. These operations can be performed from the command line. For usage details, run TBWinPE.exe with the following parameters: /bootwim /ifw /?
Appendix 5 - Searching for WinRE
If the installed WinRE is not found, you can search the system for the WinRE WIM by selecting the File menu and then the Search for WinRE... item. (A link to search is also available on the Build Requirements step if WinRE isn't found.)

Select the desired options and then click Search to search the system:
Limit folder depth (quicker search): Limits the folder depth while searching, which usually results in a quicker search (especially on systems with slower drives). Uncheck to perform a more thorough search. If you need to specify a different limit depth you can use the WinRESearchLimitVal option in the [General] section of the TBWinPE.ini file (e.g. WinRESearchLimitVal=6). Allowed values range from 3 to 30 (default is 4).
Load WIM details while searching: Enable this option to load the WIM file details while searching. In most cases, having this option enabled is recommended as you can then see the WIM type and version in the results. Additionally, WIM files detected as invalid (such as WinPE WIMs) will be excluded. However, if the system contains many WIM files, loading details can considerably slow down the search. Note that you can still view the WIM details by right-clicking on the WIM file and selecting the Show WIM details... menu item (details will be loaded at that time, if necessary).
Include alternate WIM files (winre*.wim, boot*.wim): Enable this option to include WinRE WIM filenames that start with winre or boot. This will include TBWinRE build WIM files (boot.wim) from builds on the system or a connected TBWinRE USB flash drive, for example. When this option is disabled only files named winre.wim will be found.
Search mapped network drives: By default, only local volumes are searched. If you have mapped network drives and would like to include them, enable this option. Note that searching network drives may be slow.
To select a WIM to use as the source for TBWinRE builds, select the file in the list and then click the Use WIM button. The WIM will be checked and any warnings or errors will be displayed. Assuming it's acceptable to use, the WIM file is copied into the WinRE_Backup folder and renamed WinRE_Source_###.wim (e.g. WinRE_Source_001.wim). A text file with the same name is also created with details for the WIM file. The copied file is then configured for use as the TBWinRE source.
Note: The WinRE source can also be configured on the Program Paths tab in Settings. For example, if you wish to switch back to using the installed WinRE as the source or browse to a specific WIM file.
The following menu items are available when you right-click on a WIM file in the results listing:
Show WIM details: Displays the details for the selected WIM file (details are loaded at this time, if necessary).
Use WIM as TBWinRE source: This is the same as clicking the Use WIM button. The WIM file is checked (warnings or errors will be displayed). Assuming it's acceptable to use, the WIM file is copied into the WinRE_Backup folder and renamed WinRE_Source_###.wim (e.g. WinRE_Source_001.wim). A text file with the same name is also created with details for the WIM file. The copied file is then configured for use as the TBWinRE source.
Copy WIM file: The WIM file is copied into the WinRE_Backup folder as with Use WIM, but a check is not performed and the file is not configured to be used as the source for TBWinRE builds.
Important: When using an alternate WIM, depending on the version and architecture (both for Windows and the WIM), some files may not be available. Testing this type of build and verifying the functionality you require is supported is recommended.
Appendix 6 - Create Builds from the Command Line
TBWinPE/RE Builder can be run from the command line to create or rebuild a TBWinPE or TBWinRE build. Assuming user interaction isn't required for the build, it can run unattended. To utilize this feature, run TBWinPE/RE Builder (TBWinPE.exe) from the command line and specify the /build parameter. If the build is unable to complete successfully, check the log for errors. Usage information is detailed below.
BUILD Command Usage
/build [ /tbwinre ] [ /md ]
/build /tbwinpe [ /32 | /64 | /arm64 ] [ /md ]
/build /?
Creates the specified build type (TBWinRE or TBWinPE). If build type is not specified, TBWinRE will be used. Default or preconfigured settings will be used. If the architecture is not specified for TBWinPE builds, the Windows architecture will be used.
tbwinre - Creates a TBWinRE boot media build.
tbwinpe - Creates a TBWinPE boot media build.
32 - Used with TBWinPE build to create 32-bit (x86) build.
64 - Used with TBWinPE build to create 64-bit (AMD64) build.
arm64 - Used with TBWinPE build to create 64-bit (ARM64) build.
md - Run MakeDisk after build completes.
? - Displays usage information
Examples:
/build
- Creates a TBWinRE build.
/build /tbwinpe /md
- Creates a TBWinPE build (same architecture as Windows) and then runs MakeDisk to create the boot media.
Manually Creating or Rebuilding IFW WinRE and IFW BootWIM Builds
IFW WinRE and IFW BootWIM are custom TBWinRE builds designed to be booted directly from Image for Windows to perform an automated operation outside of Windows. IFW WinRE updates the installed WinRE to a minimal TBWinRE build, while IFW BootWIM is a full TBWinRE build saved in Builder's folder. While these builds are designed to be managed automatically, advanced users may require forcing a rebuild to incorporate changes or wish to use them for performing imaging operations outside of Windows without needing to manually configure a normal BootWIM setup. These operations can be performed from the command line. For usage details, run TBWinPE.exe with the following parameters: /build /ifw /?
Appendix 7 - Extract the WinRE WIM from Windows ISO File
If the installed WinRE is missing or corrupted, you can extract the file from a Windows ISO file or the install.esd or install.wim file of the Windows installation media. The ISO file or installation media can be downloaded from Microsoft's website, if necessary.
Note: This feature requires Windows 10 or later.

Browse and select the appropriate file. After a valid file is selected, the available WIM indexes will be listed in the WIM index combo box. In most cases, the WinRE WIM is identical in all indexes. However, a specific index can be used if desired. For example, you might select your Windows Home or Windows Pro version. Index entries with a substantially smaller size will generally process more quickly.
Click the Extract button to begin the operation, which may take approximately 5 to 20 minutes (longer on slower systems). The operation cannot be canceled after mounting of the install.wim file has begun. Progress will be shown in the Status and Details areas of the dialog.
The extracted WinRE WIM file will be placed in Builder's Extract_WinRE folder and can be used as the source for TBWinRE builds or to replace the installed WinRE. The file can also be copied or moved as required if performing manual WinRE repairs.
Appendix 8 - Adding Packages
For builds based on Windows 10 or higher, compatible .msu packages can be added by listing them in the WinREPackages.txt file in the build's folder. The file should be plain text and the packages should be listed one per line using the complete path and in the order in which they should be installed. Lines beginning with ; or : will be ignored. In the case of a Cumulative Update, it should be last in the file as it may need to apply updates to other packages.
Adding this type of package can substantially increase the time required to create the build as well as the build's final size. Additionally, due to the number of changes that can be made by these types of updates, testing the build is recommended to ensure the desired functionality is retained.
Note: In most cases, Windows Updates will update the installed WinRE as required, including increasing the size of the WinRE partition, if necessary. Adding packages to the installed WinRE may result in a WIM too large to fit in the WinRE partition. This feature is mainly intended to be used when creating TBWinRE boot media which requires specific package updates. Adding packages to other TBWinRE build types is disabled by default. To enable, add the AllowMSUWinRE=1 option in the [Options] section of the TBWinPE.ini file.
Example WinREPackages.txt file contents (adding a Cumulative Update package):
E:\Cumulative Updates\windows11.0-kb5029263-x64_4f5fe19bbec786f5e445d3e71bcdf234fe2cbbec.msu