Installing Windows Drivers From A Network Share
Using TBOSDT included on the Image for Linux Boot Disk
Note: This article is obsolete. Use the OSDTOOL.TBS script instead. For an example video click here.
Overview
This tutorial covers installing a Windows storage driver from a network share by using the Linux version of the TBOSDT program from the Image for Linux (IFL) Boot Disk. The IFL Boot Disk can be created from either Windows or Linux, and can be a CD/DVD, USB flash drive, or a set of boot files for PXE network boot (from Linux only).In addition to this tutorial, please refer to Application Example #2 near the end of the TBOSDT manual (tbosdt.pdf), where you will find a description of the overall process.
Starting Point
A typical scenario for using the procedure below would come about when an existing Windows installation (for which an image exists) needs to be restored on a system where the storage controller is not compatible with storage driver used on the original system. Such conditions could occur when the motherboard or entire system has been replaced. Because the target system has a different mass storage controller (for example, a SATA controller rather than an IDE controller), the restored image will not boot because it lacks the correct driver. This is where TBOSDT comes in.A Windows driver installation using TBOSDT takes place in two stages, and can be accomplished with Windows initially in an unbootable state. The first stage (Stage 1) takes place when the IFL Boot Disk is booted from and the TBOSDT Stage 1 script is executed. This installs the driver to a point where the Windows partition will boot. It also prepares the Windows partition to automatically execute the TBOSDT Stage 2 script the next time it is booted from. The Stage 2 script then completes the driver installation.
The starting point for the procedure outlined below will be an image of a Windows XP partition that has been restored to the boot drive (HD0) of the target system. Since the driver for the new hard drive controller has not yet been installed, the Windows partition will not boot on the target system.
When restoring the Windows image, it is necessary to ensure that the restored partition is set active, and that the standard MBR code has been installed. When restoring a single partition with any of the TeraByte Unlimited image products, the Set Active and Write Standard MBR Code restore options can be used to ensure those conditions. They are not needed or available when restoring an entire drive.
Driver Files
In general, to install any Windows driver with TBOSDT, you will need the individual driver files (typically an INF, CAT, and SYS file). Ideally, you will have a floppy diskette (or other media) supplied with the hardware that contains the driver files. If not, you will need to obtain them from the hardware manufacturer. Again, the driver files must in the form of individual files, or extractable from a CAB file.This tutorial will use the specific example of installing the driver for the Intel SATA AHCI Controller on a restored image of Windows XP. This is the driver most users require for Windows XP to run on a new SATA system. To locate that driver, see the Creating a Windows XP Slipstreamed Disc using nLite tutorial.
Software Requirements
Image for Linux (IFL)TeraByte OS Deployment Tool Suite (TBOSDTS)
System Requirements
A Windows or Samba network share that can be accessed from the target system with read/write privileges over a wired network connection.If using a USB flash drive as boot media, the target system must support booting from a USB drive.
Step 1: Download and extract TBOSDTS
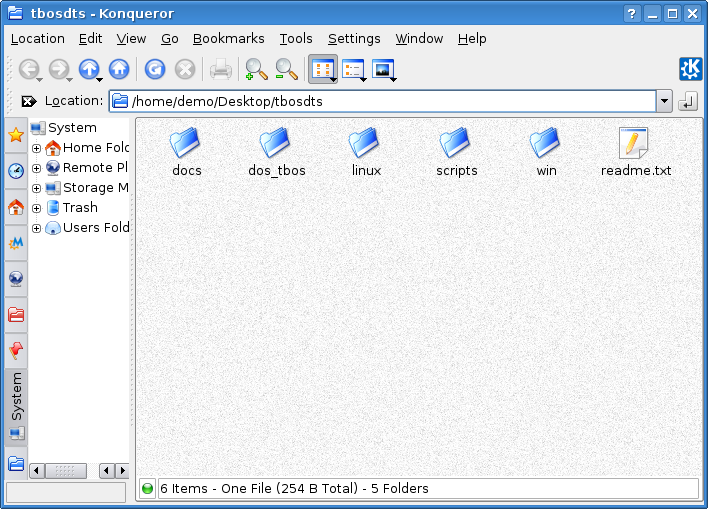
The example TBOSDT scripts (drvins_1.run and drvins_2.run), as well as the Windows version of TBOSDT (tbosdtw.exe) will be required to accomplish the driver installation. These files can be obtained by extracting the TBOSDTS zip archive (tbosdts_en.zip or tbosdts_pro_en.zip), so that the necessary files can be copied to the network share.Please note that the actual TBOSDTS programs and support files are contained in the file tbosdts.zip, which is a secondary zip file inside of the downloaded zip file. To extract tbosdts.zip, you will need the password contained in readme.txt, which will be found inside of the downloaded zip file.
Once tbosdts.zip has been extracted, the following files and directories will be available:
Step 2: Copy the required files to the network share
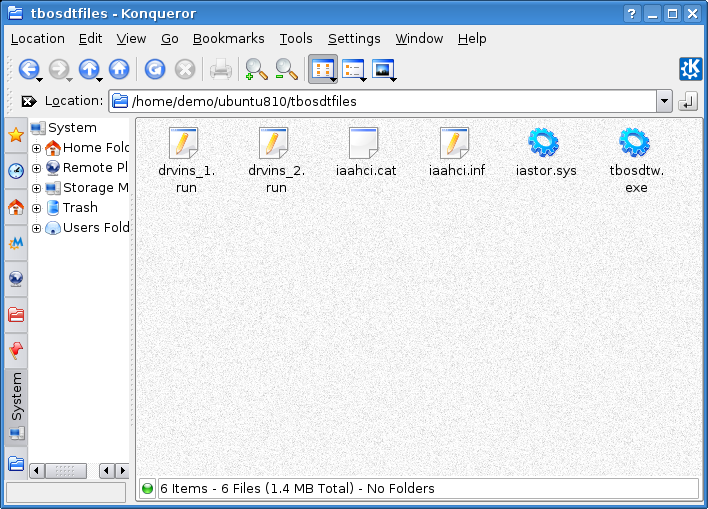
It is recommended that a separate folder/directory be created on the network share to contain the files required to install the driver. This tutorial will use a directory named 'tbosdtfiles', located in the root of a share named 'demo', on a server named 'ubuntu810'.The files required to be copied to the share are as listed below:
drvin_1.run and drvins_2.run: Copy these 2 files from the tbosdts/scripts directory. These are the Stage 1 and Stage 2 TBOSDT scripts, and these files will be edited in Step 6.
tbosdtw.exe (Windows version): Copy tbosdtw.exe from the tbosdts/win directory. This file is the Windows version of TBOSDT.
iaahci.inf, iaahci.cat, iastor.sys: These are the specific driver files needed to install the Intel SATA driver being used in this example. These files will be named differently for other drivers.
After copying all required files, the contents of the directory on the network share should be as shown below:
Step 3: Create the IFL Boot Disk
The IFL Boot Disk can be created from Windows or Linux as either a CD/DVD or a USB flash drive. From Linux, there is also the option to create the boot disk as a set of boot files for PXE network boot. A custom boot disk (which can optionally be created from Linux) is not required.To create the IFL Boot Disk from Windows, see the TeraByte Unlimited tutorial at the link below:
Image for Linux First Things First – Make a Boot Disk
To create the IFL Boot Disk from Linux, see the TeraByte Unlimited tutorial at the link below:
How To Create IFL Boot Media From A Linux Distribution
Step 4: Boot from the IFL Boot Disk and mount the network share
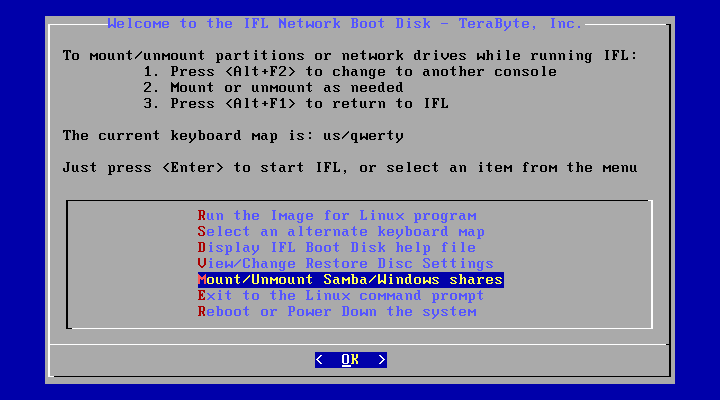
Boot the target system from the IFL Boot Disk (CD/DVD or USB flash drive). To boot from a USB flash drive, the system BIOS must be set to boot from that device. Some systems may have a key to press at boot that will being up a menu of devices to boot from, rather than having to enter BIOS setup.Once boot completes, you will be at the IFL Boot Disk main menu (welcome screen). Highlight the "Mount/Unmount Samba/Windows shares" item as shown below, then press <Enter>:
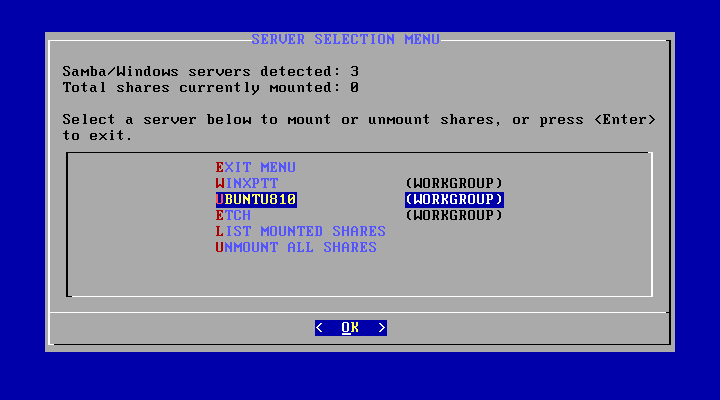
The "Mount/Unmount" menu item will detect the Windows/Samba servers available, and will then list them on a screen similar to screenshot below. On that screen, highlight the server containing the files (UBUNTU810 for this example), and then press <Enter>:
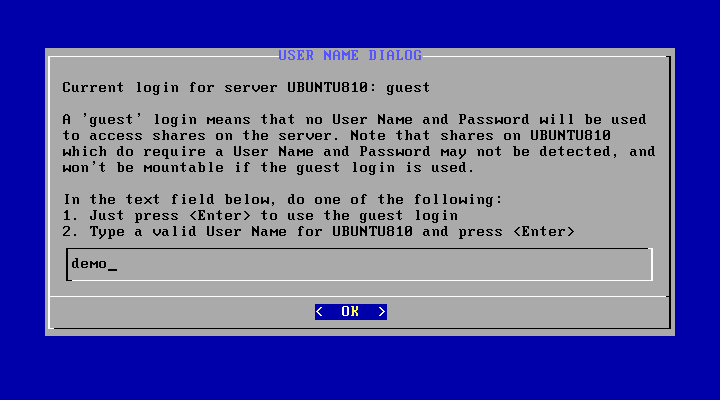
After selecting the server, type in the user name for the server/share you need to access, then press <Enter>. For this example, the user name is 'demo':
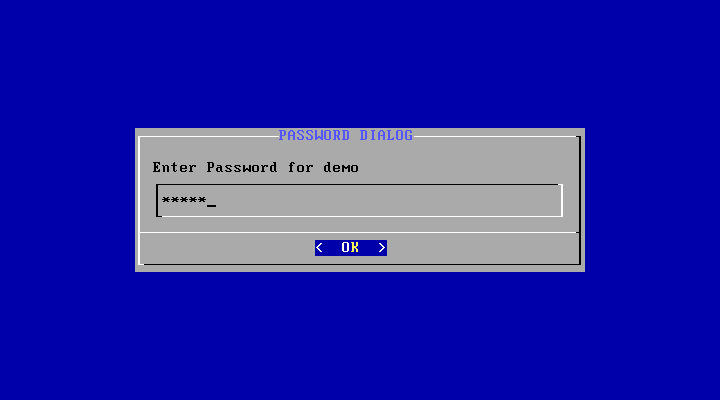
On the next screen, enter the password, then press <Enter> again:
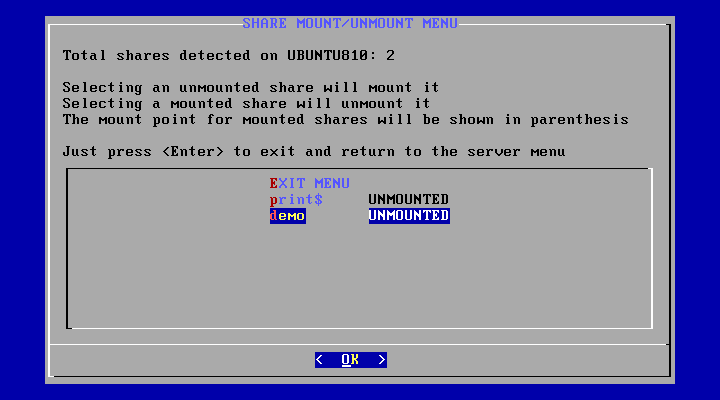
The next screen will list the shares available to mount on the server. Highlight the share you need to access (demo for this example), and then press <Enter>.
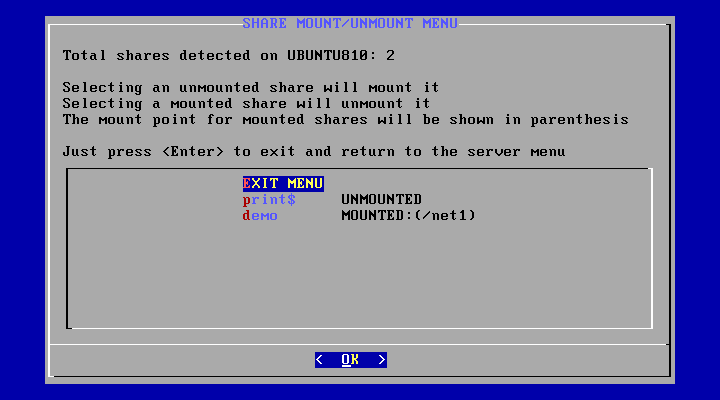
The share should now be mounted, and that will be indicated by the mount status changing from "UNMOUNTED" to "MOUNTED:(/net1)" as shown below:
If the share fails to mount (or is not listed on the share menu), that will usually be due to an incorrect user/password being entered. In that case, you can exit back to server menu, select the server, and try entering the user name and password again.
The (/net1) in parenthesis is the mount point for the network share. The mount point is the directory in the local file system where the contents of the share can be accessed. The mount point will be used when the Stage 1 script (drvins-1.run) is edited in Step 6 below. The mount point will always be /net1 unless another network share has been mounted first.
Choose "EXIT MENU" to get back to the server screen. On this screen you should now see a value of 1 for "Total shares currently mounted" as shown below:
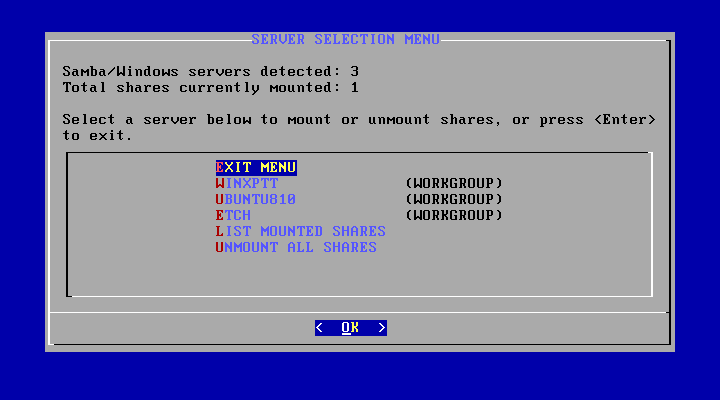
Select "EXIT MENU" to exit back to the main boot disk menu. On that menu, highlight "Exit to the Linux command prompt", then press <Enter>:
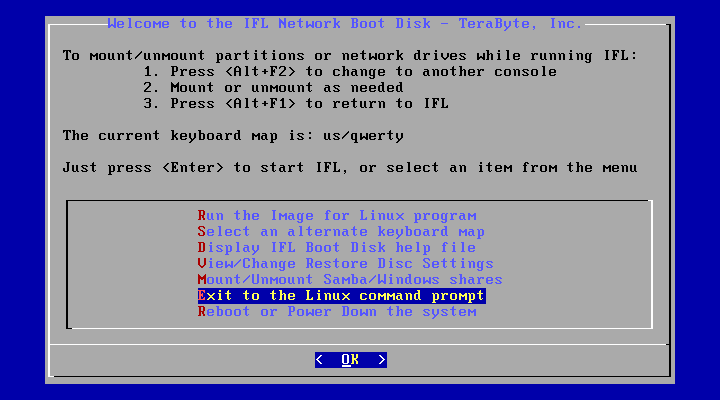
That menu selection will leave you at a Linux command prompt. To further verify that the share is mounted, and that you can now access files on the share, run the command 'ls /net1/tbosdtfiles'. That command will list the files previously copied to the tbosdtfiles directory in Step 2 above, and should result in the output shown below:
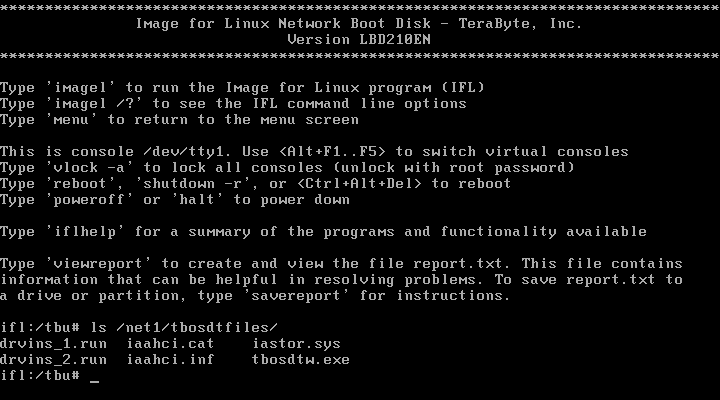
The files copied to the share in Step 2 can now be seen in the listing of the tbosdtfiles directory on the mounted share.
Step 5: Determine the partition ID for the target partition
This step is to determine the partition ID for the target Windows partition. This value is used in step 1 of the Stage 1 script (drvins_1.run) to ensure that the correct partition is mounted during driver installation. The Stage 1 script will be edited in Step 6 below, and the value determined here will be needed then.To determine the partition ID, run the command 'tbosdt' from the command prompt to start the TBOSDT program in interactive mode. Then, at the TBOSDT command prompt, run the command 'list hd 0' to list partitions on drive HD0. That will result in an output similar to the following:
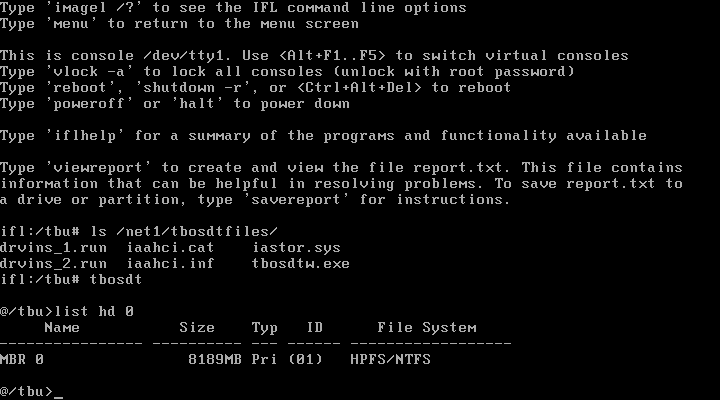
In this case, there is only one partition on the drive, and it has a partition ID of 1, which is shown in parenthesis above as (01) in the ID column. This value matches the partition ID in the default copy of drvins_1.run. If the partition ID is something other than (01), the partition ID value in drvins_1.run will need to be changed in Step 6.
Please note that the partition ID is a hexadecimal number, and should be entered in hexadecimal notation in drvins_1.run. For example, if the partition ID is displayed as (0B) by TBOSDT, that value would be entered as 0xB in drvins_1.run (the leading zero can be omitted). A partition ID of (2C) would be entered as 0x2C.
Type 'exit' to quit the TBOSDT program, and return to the Linux command pompt.
Step 6: Edit the TBOSDT scripts on the network share
This step is to make some necessary changes to the default TBOSDT scripts (drvins_1.run and drvins_2.run) that were copied to the network share in Step 2 above. The files will be edited using the 'nano' text editor included on the IFL Boot Disk.To edit drvins_1.run, start the nano text editor with the command 'nano /net1/tbosdtfiles/drvins_1.run', as shown in the screenshot below:
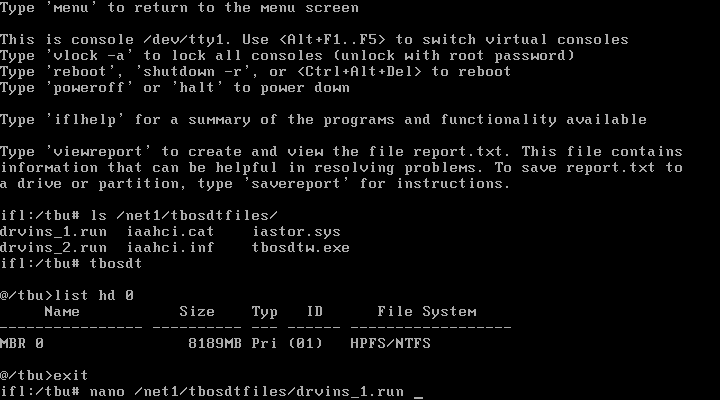
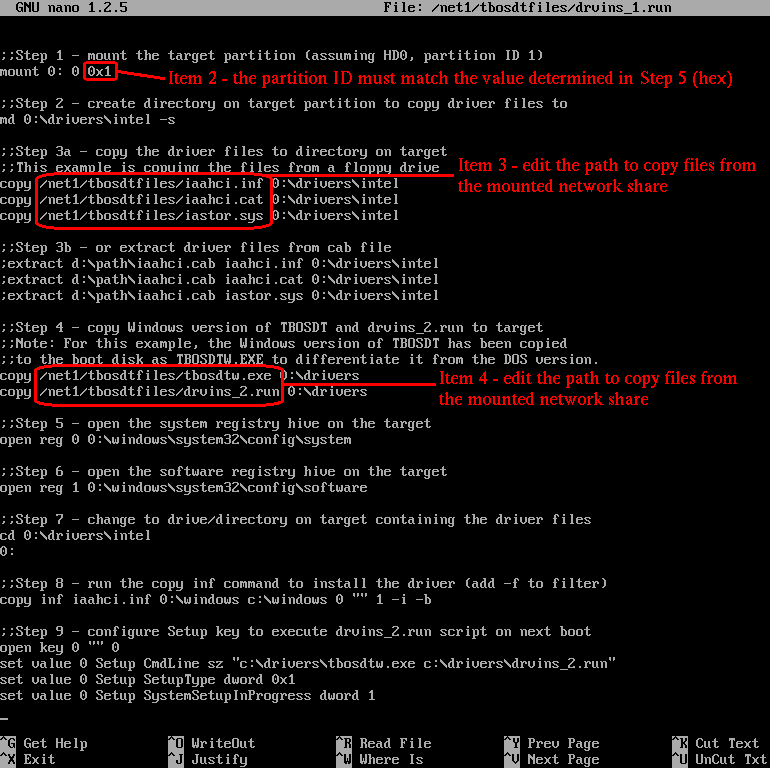
For drvins_1.run, the following changes are required for this example:
1. Uncomment all lines starting with a single ";" except the 3 lines in step 3b (16 lines)
2. In step 1, change the target partition ID to the value determined in Step 5 above (if necessary)
3. In step 3, adjust the path to copy the files from the network share (3 lines)
4. In step 4, adjust the path to copy the files from the network share (2 lines)
The screenshot below shows drvins_1.run in the nano text editor after making the changes listed above. The changes are circled and numbered to correspond with the list.
To save changes to the file, use the <Ctrl + O> key combination (WriteOut), and then press <Enter>.
To exit the nano editor, press <Ctrl + X>.
To edit drvins_2.run, start the nano text editor with the command 'nano /net1/tbosdtfiles/drvins_2.run'.
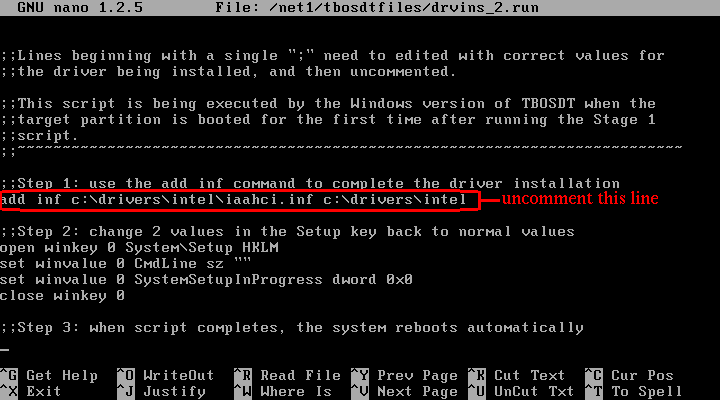
For drvins_2.run, the following change is required for this example:
1. In step 1, uncomment the line for 'add inf' command (1 line)
The screenshot below shows drvins_2.run in the nano text editor after editing, with the change circled:
To save changes to the file, use the <Ctrl + O> key combination (WriteOut), and then press <Enter>.
To exit the nano editor, press <Ctrl + X>.
Now that both TBOSDT scripts have been edited, the actual driver installation can begin.
Step 7: Execute the Stage 1 script (drvins_1.run)
To execute the Stage 1 script (drvins_1.run), run the following command from the Linux command prompt:tbosdt /net1/tbosdtfiles/drvins_1.run
For the Intel SATA driver being installed in this example, the output from the script will look like the following:
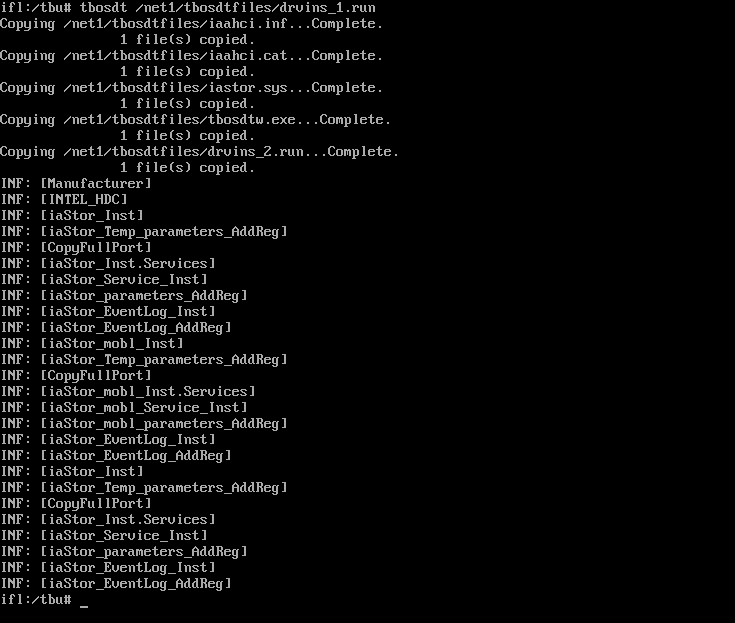
When the Stage 1 script is executed, observe the output from TBOSDT on the screen and watch for any error messages. Typically, TBOSDT will terminate the script execution when it encounters an error condition, so that any error message(s) will still be visible on the screen, even though some of the output may scroll off. If the output you want to see scrolls off the screen, you can scroll back up by using <Shift + Page Up> one or more times, or the output can be redirected to a file and then viewed a page at a time with the 'more' command as follows:
tbosdt /net1/tbosdtfiles/drvins_1.run > filename
more filename
For troubleshooting purposes, it can also be helpful to select the frame buffer video mode (option 2 at the boot menu) when booting the IFL Boot disk. That will make more text viewable without scrolling.
Common causes for errors include:
1. Attempting to mount the wrong drive/partition (step 1 in drvins_1.run)
2. Failing to edit one or more commands for correct values in drvins_1.run (see Step 6)
3. Syntax and/or typing errors in drvins_1.run
The Stage 1 script must run without errors before booting from the target partition can be expected to be successful.
Step 8: Boot the target partition to execute Stage 2
Once the Stage 1 script has executed successfully in Step 7, it should now be possible to boot from the target partition. The following sequence of steps is recommended:1. Boot the system normally from the target partition. On first boot, a terminal window will appear, and the Stage 2 script (drvins_2.run) will be executed. After a typical delay of a few seconds, the system should reboot automatically. (This will only happen once, on the first boot).
2. On reboot, boot Windows into Safe Mode as described in Step 3 below. Using Safe Mode allows Windows to detect new hardware without hanging and/or other issues that can arise due to certain types of new hardware, particularly video adapters.
3. To get into the Windows XP Safe Mode: As the computer is booting (just after the post), continuously tap the "F8 Key" which should bring up the "Windows Advanced Options Menu". Use your arrow keys to move to "Safe Mode" and press your Enter key.
If
you can't boot in to safe mode it may be due to the fact that the HAL
also needs to be replaced. While the details are outside the
current scope of this article, this is basically done by copying the
correct file to the \windows\system32\hal.dll. The HAL files
available (through Win2003) are HAL.DLL, HALAPIC.DLL, HALMPS.DLL,
HALACPI.DLL, HALAACPI.DLL, HALMACPI.DLL. The most common file
needed for modern systems is HALACPI.DLL, HALAACPI.DLL or HALMACPI.DLL
which can be found in the \windows\servicepackfiles\i386 folder.
You can use TBOSDT to mount the partition and copy the file needed.
4. Once up and running in Safe Mode, allow Windows to complete detection of the new hardware.
5. Reboot when prompted.
6. On reboot, allow Windows to boot normally. The driver installation should now be complete.
Please note that WPA (Windows Product Activation) may be tripped because of the new hardware detected, and if so, Windows will need to be reactivated.
