Creating a Windows XP Slipstreamed Disc using nLite
Introduction
Suppose you have a new computer running
Windows Vista and, like many, want to use BootIt Next Generation (BING) to
dual-boot Windows XP and Windows Vista. While this is easily
done using BING by following the video tutorial on
how to install Windows XP to its own partition, one problem
remains: The default Windows XP installation disc doesn't
support your new SATA storage devices.This tutorial will take you through the process of using a third-party utility named nLite to create a new Windows XP installation disc that contains the SATA drivers and latest service pack needed for Windows XP setup to properly identify your hard drives. This process is called slipstreaming.
Most new HP and Dell systems make use of an Intel SATA chipset. As a result, this tutorial uses the Intel SATA drivers as an example.
Overview
In essence, the slipstreaming process detailed below will involve:- Downloading and installing the nLite software utility
- Downloading and extracting the 32-bit SATA drivers from the Intel web site
- Downloading the latest Windows XP service pack
- Running nLite to create a new, slipstreamed 32-bit Windows XP installation disc
Download and Install
- Visit the Intel website and download the
Intel Rapid Storage Technology F6 Driver Diskette version to a folder on
your system. Essentially the version that gives you the individual .inf,
.cat, .sys files instead of an installer.

- Download the nLite installer to a folder on your system.
Here I've downloaded both the driver and nLite installer to the same folder on my desktop:

-
Double click on the Intel drivers you downloaded
(f6flpy32_85 in this example) and choose to extract all
files. Leave the default destination folder
and click extract.

- Go back to the folder containing the nLite installer and double click it
to start the setup wizard. You can complete the installation using the
defaults by following the setup wizard.

Creating the Slipstreamed Disc
- Run the
nLite application from the Windows Start Menu.

- Insert your Windows XP installation CD into your CD/DVD drive.
Note: If the AutoPlay dialog shows up or Windows XP installer starts, cancel it by clicking the X in the upper right corner of the window.
- On the Locating the Windows installation dialog click the Browse button.

- Choose the drive that contains your Windows XP installation
disc.

- Choose a location to save the files.

Here I'm choosing to Make New Folder named XPDisc on the Local Disk (C:) drive:

- nLite will copy the files from the CD to the folder
you chose above. Once completed, it will display
information about the XP installation files.
Review the information and then click Next.

- Click Next to skip the Presets dialog.

- Select the Service Pack, Drivers, and Bootable ISO tasks, and then click Next.

- Obtain the latest (or desired) Windows service pack
from the Microsoft website.
Here I used the link provided in nLite to find the service pack download:

Then I hunted around the links at the Microsoft website for the downloadable service pack (you do not want the service pack from Windows Update or Microsoft Update). Important Note: If you are using Vista to create the slipstream disk then you should only download SP2 (not SP3) or your XP product key may not work on new installations. Note Update: The key problem under Vista was supposable fixed in an nLite update but we haven't confirmed. Vista users can obtain XP SP2 here. XP users can obtain XP SP3 here.

I saved it to a folder on my computer:
- In nLite click the Select button to select the file
service pack file you just downloaded above:

Here's where I saved it:

- nLite now takes care of extracting the files and
integrating the service pack:

- Once the service pack integration has completed
above you need to integrate the SATA drivers you
downloaded earlier. Click the Insert option and
choose one of the items from the folder where you
extracted the files:


Here's where the files were extracted earlier. I selected the iaAHCI item and clicked open:

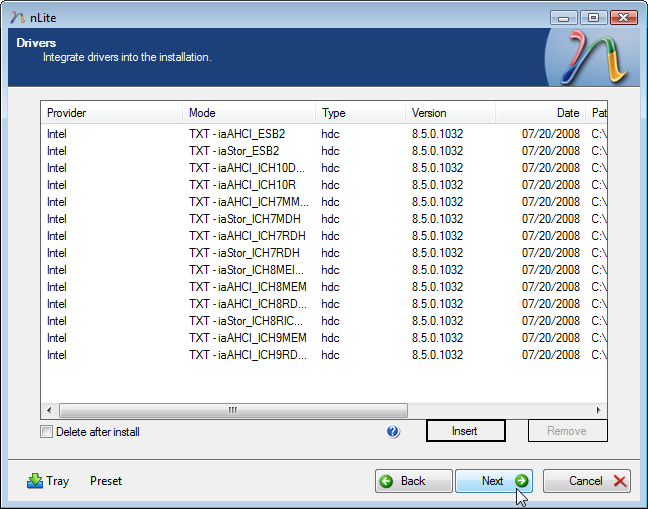
- Select the drivers to integrate. Here I
selected all the drivers by clicking on the first one, holding down the Shift key while clicking on the last one, and then clicking OK:

- Once all the drivers are in to be integrated, click Next:
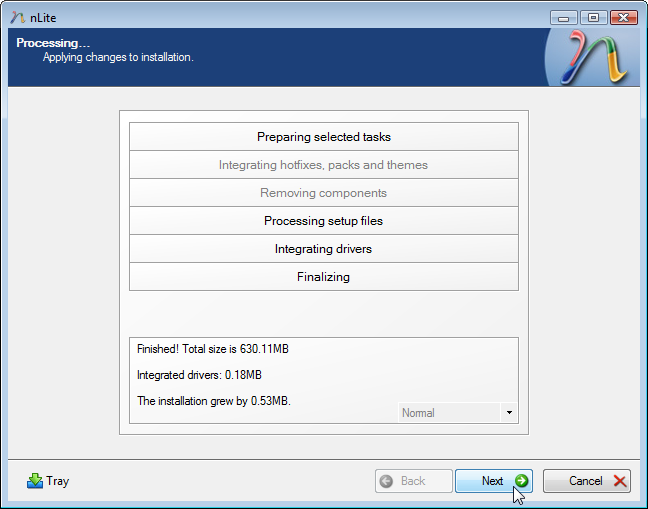
- Click Yes to start the process:

Once it has finished, click Next:
- Now burn a new disc by inserting a blank CD or DVD disc in the
drive, choose the the Direct Burn mode, select the
correct device and the verify option, and finally click the
Burn button:

- You can now use the disc to install Windows XP on to your new computer system. Watch the video on how to install Windows XP to its own partition found on the How-To pages.