


Ejecución de Image for Linux sin un disco de arranque
Introducción
Para ejecutar Image for Linux (IFL), lo habitual sería
crear un CD/DVD o una unidad flash USB de arranque y, a continuación, arrancar
desde
dicho medio. Este
artículo describirá un método para ejecutar IFL
sin
necesidad de un disco de arranque. En su lugar, IFL se ejecutará desde un archivo de arranque
ubicado en su disco duro.
Existe un artículo similar que describe cómo hacer
esencialmente lo mismo con Image for DOS (IFD) en lugar de IFL. Puede
encontrar dicho artículo en este enlace: https://www.terabyteunlimited.com/howto/howto-ifd-bootfile.htm
Requiere TBOSDT 1.47+ y bootfile.exe/bootfile64.exe 2.0.5 o posterior para el arranque en modo BIOS heredado (Legacy BIOS). Requiere TBOSDT 3.08+ y bootfile.exe/bootfile64.exe 3.00+ para el arranque UEFI (unidades GPT). Para el arranque UEFI, el sistema debe ser compatible con el arranque de la partición de sistema EFI genérica/estándar (no se requiere un elemento de arranque UEFI específico).
Resumen general
El arranque desde un "archivo de arranque" es posible gracias a la utilidad gratuita de TeraByte Unlimited BOOTFILE (bootfile.exe) ), que se incluye con la TeraByte OS Deployment Tool Suite. Para unidades MBR/EMBR, la utilidad BOOTFILE de TBOSDT se puede utilizar para configurar el registro de arranque maestro (MBR) para arrancar una partición NTFS, FAT o FAT32 que se encuentra contenida en un archivo contiguo en una partición NTFS, FAT o FAT32. Para unidades GPT, la utilidad BOOTFILE de TBOSDT se puede utilizar para configurar la unidad para arrancar una partición de sistema EFI FAT32 que se encuentra contenida en un archivo contiguo en una partición NTFS, FAT o FAT32.
Existen muchas formas diferentes de configurar un archivo de arranque , pero en este caso lo configuraremos para arrancar desde Windows hacia IFL. Una vez iniciado IFL, el MBR/GPT se restaura automáticamente mediante la versión para Linux de BOOTFILE. Esto prepara el sistema para volver a arrancar en Windows (es decir, arrancar normalmente) cuando termine la sesión de IFL .
Configuración inicial
Nota: Aunque en estas instrucciones se indican las versiones mínimas de los distintos programas, se recomienda utilizar las versiones actuales de los mismos.
- Descargue el archivo de configuración del archivo de arranque de IFL
(iflsetup.zip). Este archivo zip contiene los archivos necesarios para configurar y arrancar desde el archivo de arranque de IFL.
- Si aún no lo ha hecho, instale IFL (versión 2.57 o posterior) para
que sus archivos estén disponibles. Puede ser tanto el archivo zip independiente de IFL extraído en una carpeta
como la versión completa de IFW/IFD/IFL que incluye IFL e IFD con
la instalación de IFW. Específicamente, el archivo iflnet.iso debe
estar disponible para poder montarlo y copiar archivos
desde él.
- Si aún no lo ha hecho, descargue y extraiga la TeraByte OS Deployment Tool Suite Professional (tbosdts_pro_en_v3.zip)
en el sistema para que sus archivos estén disponibles. El
archivo zip contendrá un segundo archivo zip
en su interior que requerirá una contraseña para su extracción. La
contraseña se encuentra en el archivo
readme.txt incluido dentro del archivo zip. El resultado
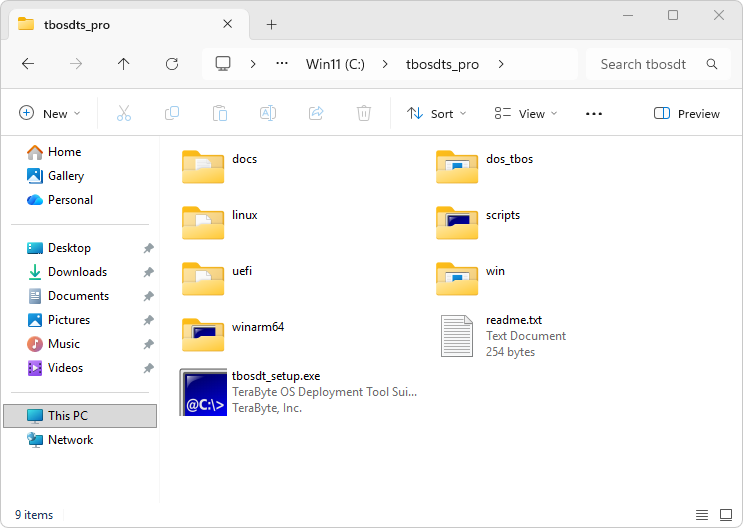
final debería ser una carpeta con un contenido similar al de la siguiente captura de pantalla:
- Extraiga iflsetup.zip
en una carpeta llamada iflsetup
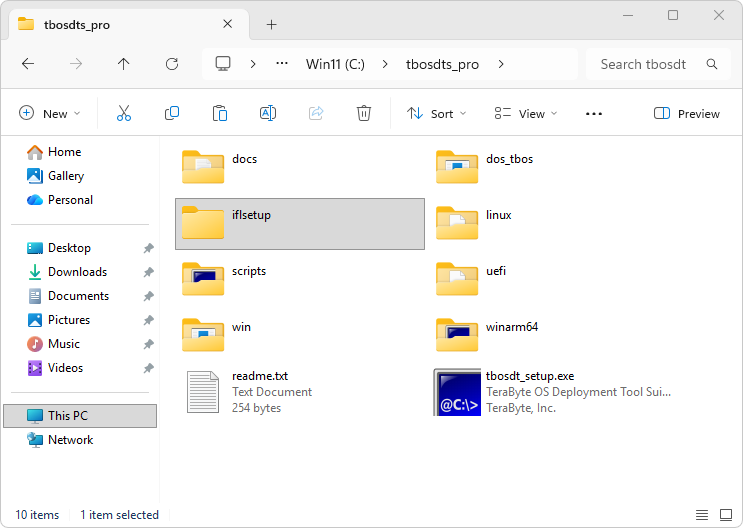
(el nombre por defecto) de modo que su contenido esté en una subcarpeta de
la carpeta TBOSDTS mostrada anteriormente. La carpeta iflsetup debe estar
al mismo
nivel que las carpetas linux, win,
dos_tbos, docs y scripts incluidas con TBOSDTS. La
carpeta TBOSDTS depende de esta
ubicación para poder encontrar los archivos que necesita. La carpeta TBOSDTS
debería verse ahora como en la captura de pantalla que se muestra a continuación:
- En una ventana del Explorador, navegue hasta la carpeta iflsetup creada
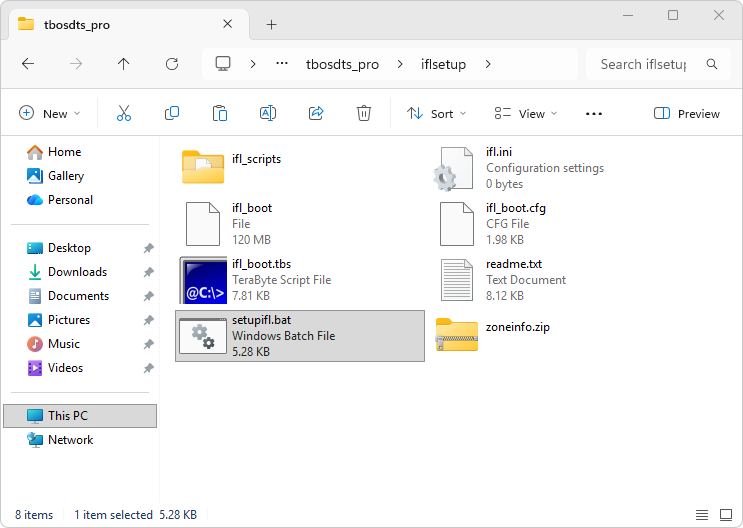
en el paso 4. El contenido de la carpeta iflsetup debe ser el que se muestra en la captura de pantalla
siguiente:
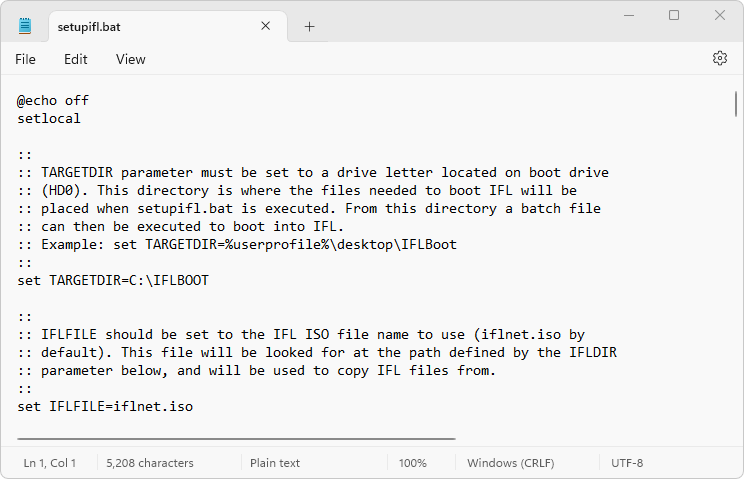
- Edite el archivo por lotes setupifl.bat (haga clic con el botón derecho y elija
Editar) para configurarlo según su sistema y preferencias. Los
11 parámetros a editar se encuentran al principio del archivo y están
explicados en los comentarios. Si utiliza la versión registrada
de IFL, será necesario editar los parámetros IFLUN e IFLPK para proporcionar su nombre de usuario
y clave de producto de IFL. Los demás parámetros a menudo pueden dejarse en sus valores
por defecto para una configuración de usuario típica. No obstante, asegúrese de comprobar el parámetro
IFLDIR para garantizar que apunta a la ubicación correcta del
archivo iflnet.iso. Deje IFLDIR sin establecer para usar el valor por defecto del paquete IFW/IFD/IFL instalado.
- Opcional:
Si desea incluir uno (o más) scripts bash ejecutables
en el disco de arranque de IFL, créelos como archivos de texto y
colóquelos en la carpeta ifl_scripts. Se puede utilizar un script ejecutable
,
por ejemplo, para ejecutar una línea de comandos de IFL automáticamente
al
arrancar. Los scripts que
coloque
en esa carpeta se copiarán al archivo de arranque de IFL y estarán
disponibles en /tbu/scripts cuando arranque desde IFL. Ya existe un script de muestra
(llamado script1) en la carpeta ifl_scripts por
defecto. Este archivo se puede abrir con el Bloc de notas haciendo doble
clic en él y eligiendo el Bloc de notas para abrirlo.
- Opcional:
Si desea ejecutar uno o más de los scripts bash
de la carpeta ifl_scripts automáticamente al arrancar, edite y elimine el comentario de la
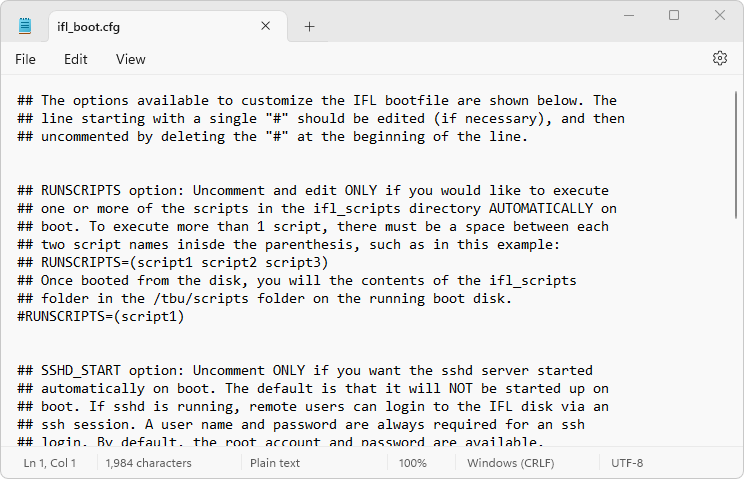
opción RUNSCRIPTS en el archivo ifl_boot.cfg. Consulte los comentarios en el
archivo ifl_boot.cfg para obtener detalles adicionales. Tenga en cuenta que, si no utiliza
la opción RUNSCRIPTS para ejecutar los scripts automáticamente, aún puede
incluirlos como se describe en el paso 7 y simplemente ejecutarlos
manualmente.
- Opcional:
Si lo desea, edite la copia existente de ifl.ini (vacía por defecto) para añadir
cualquier configuración personalizada de IFL. Consulte el Manual de usuario de IFL para obtener información completa
sobre los ajustes que se pueden incluir en ifl.ini.
- Desde la carpeta iflsetup, ejecute el archivo por lotes setupifl.bat
. Esto puede hacerse haciendo doble clic en el archivo o
abriendo una ventana de símbolo del sistema en la carpeta iflsetup y ejecutando el
comando 'setupifl'. El archivo setupifl.bat creará el archivo de arranque de IFL, así como un archivo por lotes para arrancar desde él.
Arranque desde el archivo de arranque
Una vez que setupifl.bat finalice su ejecución, el directorio de destino especificado en setupifl.bat (C:\IFLBOOT por defecto) debería existir ahora y contener 3 archivos: el archivo de arranque de IFL, la utilidad bootfile.exe (versión para Windows) y un archivo por lotes para iniciar el arranque desde el archivo de arranque. El nombre del archivo por lotes y del archivo de arranque se basará en el valor elegido para el parámetro IFLBIN en el archivo setupifl.bat. Por defecto, IFLBIN está establecido en "ifl", por lo que los archivos por lotes y de arranque se llamarán run_ifl.bat e ifl.bin respectivamente, tal como se muestra en la siguiente captura de pantalla: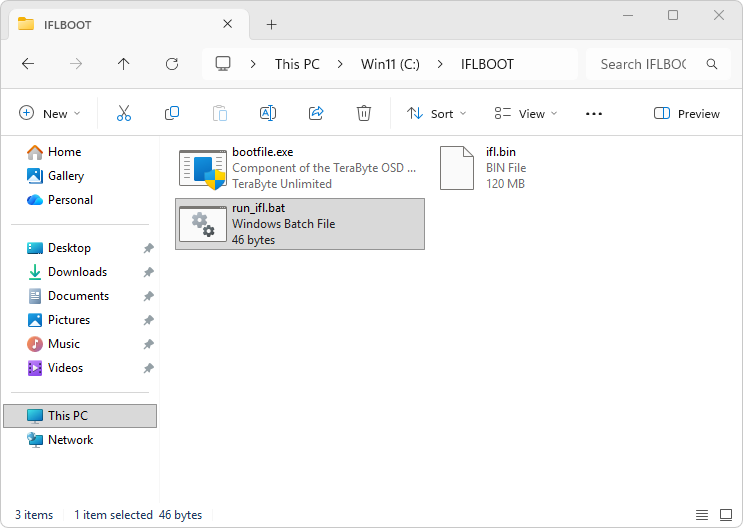
Para iniciar el arranque desde el archivo de arranque, haga doble clic en el archivo por lotes . Esto debería provocar el reinicio del sistema y la aparición del menú de arranque inicial de IFL (como se muestra en la captura de pantalla siguiente). Utilice el menú de arranque para iniciar IFL como lo haría normalmente . Cuando el disco de arranque de IFL se inicialice al arrancar, el MBR/GPT será restaurado automáticamente por la versión para Linux de BOOTFILE, de modo que en el próximo reinicio el sistema arrancará normalmente.
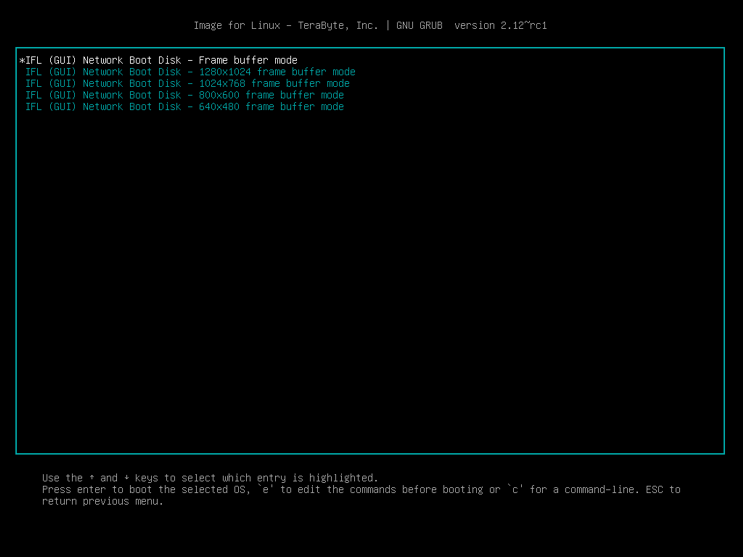
El menú de arranque de IFL mostrado arriba es el mismo que el menú de arranque estándar de IFL cuando se arranca en modo UEFI. Al arrancar en modo BIOS heredado, hay un elemento de menú adicional (Boot to TBOS to restore MBR). El propósito de este elemento es proporcionar un método sencillo para restaurar el MBR original en caso de que IFL no logre arrancar (se bloquee) en un sistema determinado. Esta situación debería ser poco frecuente, pero le dejaría en una situación difícil si ocurriera, ya que no podría volver a su sistema operativo normal tras intentar arrancar IFL. Si esto sucede, se proporciona este elemento de menú para que pueda seleccionarlo (escriba el número del elemento del menú y pulse
Apéndice 1: Descripción de los archivos incluidos en iflsetup.zip
ifl_boot - Este archivo es el
punto de partida para crear el archivo de arranque de IFL. Contiene un sistema de archivos
FAT de 120 MiB que tiene instalado syslinux y también contiene
un archivo de imagen de disquete con la versión para DOS de bootfile.
Al arrancar en modo BIOS heredado, este archivo se puede arrancar desde el menú de arranque para restaurar el MBR en
caso de que IFL no logre arrancar en el sistema.
ifl_boot.cfg
- Este archivo se puede editar para configurar el servidor SSHD para
que se inicie al arrancar y también para configurar uno o más scripts para
que se ejecuten automáticamente.
ifl_boot.tbs
- Este tbscript es ejecutado por tbosdtw.exe, al cual se llama desde
setupifl.bat. Monta y copia archivos al archivo de arranque de IFL. El procesamiento de
archivos .tbs requiere la versión profesional (no de prueba) de
tbosdtw.exe.
ifl.ini
- Este archivo se puede editar para añadir cualquier configuración personalizada de IFL
tal como se documenta en el manual de IFL. El archivo está vacío por defecto y
es copiado al archivo de arranque de IFL por el script ifl_boot.tbs.
setupifl.bat
- Este archivo por lotes se ejecuta para crear el archivo de arranque de IFL, así
como un archivo por lotes para arrancar desde él. Estos archivos, junto con la
versión para Windows de bootfile.exe, se copian a una carpeta especificada.
El principio de este archivo contiene variables que pueden ser
configuradas según sus preferencias. Estas variables están documentadas en
el archivo.
ifl_scripts
- En esta carpeta es donde se pueden colocar uno o más scripts bash para
que ifl_boot.tbs los copie al archivo de arranque de IFL. Para
que uno o más de los scripts se ejecuten automáticamente al arrancar,
edite y elimine el comentario de la opción RUNSCRIPTS en el archivo ifl_boot.cfg.
readme.txt - Documentación e información de uso para iflsetup.
zoneinfo.zip - Una referencia de zona horaria que se puede consultar al configurar la variable TIMEZONE en el archivo ifl_boot.cfg. Básicamente es una copia comprimida de
un directorio /usr/share/zoneinfo típico de una distribución de Linux.
Apéndice 2: Uso de Image for Linux para determinar las opciones de la línea de comandos
Puede utilizar el propio IFL para determinar una línea de comandos que desee utilizar en un script (véanse los pasos 7 y 8). Para ello, proceda de la siguiente manera:- Ejecute Image for Linux y proceda como si fuera a
realizar el tipo de copia de seguridad o restauración que
desea automatizar hasta llegar a la pantalla "Backup Options" u "Restore Options".
- En la pantalla de opciones, configure los ajustes según desee para la operación de IFL que se está configurando. Nota: En la CUI de IFL, para marcar una opción, resáltela y pulse
la barra espaciadora.
- Proceda a la pantalla "Summary".
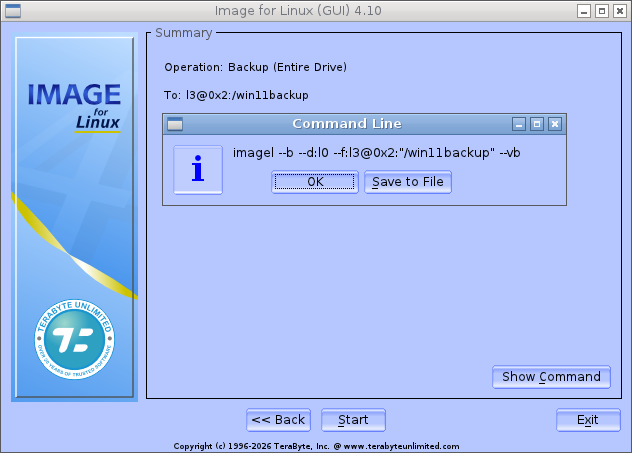
- En la pantalla "Summary", pulse la tecla F6 (CUI de IFL) o haga clic en el botón Show Command (GUI de IFL) para
mostrar las opciones de línea de comandos aplicables. En la siguiente captura de pantalla se muestra un ejemplo de lo que
verá:
Nota: Ciertas opciones, como la contraseña de cifrado o las opciones de modo desatendido (/um, /uy, /un), no se mostrarán en esta pantalla. Para obtener la documentación completa sobre las diversas opciones de la línea de comandos , consulte el Manual de usuario de IFL.