Setting Up Image for Linux On A Linux Distribution
This tutorial covers how to set up Image for Linux on a
Linux distribution. It is recommended that IFL be set up in its own
directory, completely separate from other files. In addition, IFL must
be extracted and set up on a Linux partition (a Linux file system).
This is mentioned since some users may find it convenient to set up IFL
on a FAT32 or NTFS partition that is shared between Windows and
Linux on a dual boot system. However, this will not work for several
reasons, and the Linux scripts will not run on a non-Linux file system.
The starting point for the procedure below will be with the full version IFL zip file downloaded and placed on the KDE or Gnome Desktop. The filename for the IFL CUI download is ifl_en.zip; for IFL GUI, it's ifl_en_gui.zip. The trial version filenames are different, but the procedure is still the same. Note that the "no net" versions of the downloads (ifl_nonet_en.zip, ifl_nonet_en_gui.zip) do not include the files necessary to install in Linux.
While
this procedure will set up IFL in a directory on the desktop, it can also
be set up in other locations by using the same basic procedure. The ifl_en_gui.zip file will be used in this tutorial.
Extract the IFL zip file to its own directory
While IFL can be extracted
to a directory of any name you choose, this example will extract it to
a directory with the same name as the zip file. In Gnome, right-click
the file and choose Extract Here. In KDE, right-click the
zip file and choose Extract | Extract archive to... and then select the folder ifl_en_gui (or, if available, select Extract archive here, autodetect subfolder). A new directory named ifl_en_gui will be
created and will show the following contents:

Open a terminal window, change to the IFL directory, and start the setup script
Open a terminal window on the desktop. In KDE, the default terminal program is Konsole. In Gnome, the default terminal program is Gnome Terminal. With the terminal window open, use the command cd Desktop/ifl_en_gui to change to the IFL directory.
If you are using a distribution where the root account is disabled (such as Ubuntu), use the sudo command to run the setup script (enter password when prompted): sudo ./setup
For other distributions, run the command su and enter the root password at the prompt to become root. Then as root, run the command ./setup to start the setup script.
The screenshot below shows these commands entered, with the
setup script about to be started (waiting for password):

After starting setup, you will be prompted to accept or decline the License Agreement. The License Agreement text can be found in the file LICENSE.TXT in the IFL directory.

Note: After accepting the license, if there are any errors reported regarding packages not installed or required files not found, please see the following KB article to install the required libs: How to run IFL on 64-bit Linux distributions
Enter the Product Key (registered version only)
On the next screen, enter your IFL Product Key in
the text field
provided. An
IFL V3 Product Key consists of 29 characters, including 5 dashes. You can
find
your Product Key on the TeraByte Unlimited Product Download page for
register
users.
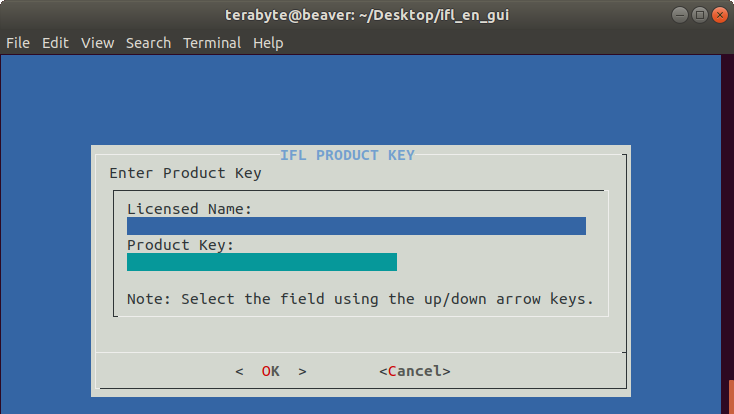
Note that if you have previously run setup and have already entered your Product Key, it will be displayed at the top of the screen. In this case, you can just press <Enter> to use the same one, or type in a new one if you entered it incorrectly the first time. If no Product Key is entered, you will be prompted to enter it the first time you run IFL from the distribution and also the first time you start IFL from any boot media you create.
If you running the setup script for IFL GUI you will be prompted to enter your BootIt license. If no license is entered you will be prompted for it when you run Partition Work.

Select Restore Disc Settings (optional)
The next screen is an informational message about the Restore Disc Settings menu, which will appear next. The settings on that menu will apply only to restore discs created while running IFL from the Linux distribution (they do not apply to restore discs created from IFL boot media).

Press <Enter> to bring up the Restore Disc Settings menu.
At this menu, you can simply press <Enter>
to keep all
settings at their defaults, or you can select items to change from the
menu,
such as the keyboard map, the video mode, or the IFL Language version.
Each
menu item has help text on the screen to guide you through the
selection. Any setting you change will be remembered the next time you
run setup. When finished, ensure that the first menu item is
highlighted, and press <Enter> to continue with setup.

Select the IFL language version for IFL when running from the distribution
The next screen is to select the IFL Language
version for when running IFL from the Linux distribution. This can
be a
different language version than the one selected for restore discs. The
screen provides instructions on how to make additional
language
versions available. To accept the default (English), just press
<Enter>
to continue.

Completing setup
The setup script will complete and return you to the Linux command prompt.
Note that while IFL can be run as a normal user,
you may not be able to access hard drives from
within IFL. This can normally be corrected by adding the user to the
"disk" group, which, in the case of Ubuntu, can be done by running the command adduser user disk as root (e.g. adduser terabyte disk). You
will have to log out and back in again before that change will take
affect. See the following KB article for details:
Unable to view or access drives with IFL, TBOSDT, or Partition Work as normal user in Linux
On 64-bit distributions you will need to install 32-bit libraries to run Image for Linux. If these weren't installed earlier in order to run the setup script you'll need to install them now. See the following KB article for details: How to run IFL on 64-bit Linux distributions

Assuming the proper 32-bit libraries are installed, you can start the IFL
program by
running the command ./imagel from the IFL directory.

Note: IFL should not be used to create images of any mounted partitions when running from the distribution. The image created may not be reliable due to files changing during the imaging process. If a partition cannot be unmounted from the running system, IFL boot media should be used to create the image.
Optional: Creating a launcher (Gnome) or an application link (KDE) to start IFL
The two sets of screenshots below run through the general process of creating a launcher/application link so that IFL can be started by clicking an icon on the desktop. These will result in IFL being started by a normal user (not root). Note: Ubuntu 18.04 LTS and Kubuntu 18.10 were used for this tutorial. Instructions will vary depending on the distro and version being used.
Creating a launcher for IFL in Gnome
If gnome-panel is not installed (it is not installed by default on newer versions), install it by running the following command from a Terminal:
sudo apt-get install --no-install-recommends gnome-panel
Run the following command to create a new launcher on the desktop:
gnome-desktop-item-edit ~/Desktop/ --create-new
The Create Launcher window is displayed. In the Type box, select Application if creating a launcher for IFL GUI; select Application in Terminal if creating a launcher for IFL CUI. In the Name field, enter a name for the launcher. Click on the default icon to the left if you want to select a different icon.

In the Command field, select the Browse button and
navigate to the IFL directory. In the IFL directory, select the file imagel, and then select Open.

The Command field should now contain the path to
the imagel file. In the the screenshot below, the IFL icon was also selected. Click on OK to finish. An icon will appear on the
desktop that can now be used to start
IFL. You can change settings by right-clicking the icon and selecting
Properties.

Creating an application link for IFL in KDE
Right-click the desktop and choose Create New | Link to
Application.... On the General tab, enter a name for the application link
(IFL). Click the default icon to the left of the name field if you want
to select a different icon (shown with IFL icon here).

On the Application tab, enter the name and description as desired.

In the Command field, click on the Browse button,
and navigate to the IFL directory. In the IFL directory, select the
file imagel, and then choose
Open.

The Command field should now contain the path to
the imagel file. Optionally, the Work path field can be set to
directory where
you would like IFL to start from when opening an image file to restore
from, validate, or backup to. This location would be used when you
select File (OS) from the Backup To, Restore From, or Validate
screens.

If you are using IFL CUI, click on the Advanced Options button, select Run in terminal, and then choose OK.

Click OK and an icon will appear on the desktop that can now be used to
start
IFL. You can change settings by right clicking the icon and selecting
Properties.