Creating a VistaPE Boot Disc Containing Image for Windows
This tutorial is a guide to creating a VistaPE boot disc containing Image for Windows (IFW) and bootable as either a CD/DVD or as a UFD (USB Flashdrive). VistaPE is a project that can be downloaded and run from within the WinBuilder utility to create boot discs based on various versions of WinPE, while also providing a user-friendly Windows environment from which to work.
Requirements:
Before beginning, please review the following requirements for the project:
- Operating System:
Windows XP SP2 or later is required. Windows 7, Windows Vista SP1 (or later), or Windows XP SP3 is recommended.
Note: The computer used to create the VistaPE boot disc can be running a 32-bit or 64-bit version of the supported operating systems.
- Build Source:
- Highly Recommended: Microsoft Vista DVD (32-bit version)
Note: Using a 64-bit Vista DVD as the source for a build is not currently supported. If a 32-bit Vista DVD is not available, you can use the Windows AIK instead (see below). As a further clarification, the VistaPE boot disc can be built from a 64-bit Windows OS, but it cannot be built using a 64-bit Vista DVD as the source.
While a VistaPE boot disc can be created using just the Windows AIK, using a Vista DVD will allow features and programs to be included in addition to those supported by the Windows AIK. See Additional Notes below for more information.
- The Windows Automated Installation Kit (AIK)
The Windows AIK is required to build the VistaPE boot disc. At the time of this writing, it's recommended to use the Windows Vista SP1 AIK. Using the Windows 7 AIK may result in build errors or other problems. See Additional Notes below for more information.
This is a very large download (1.3GB). A high-speed internet connection is recommended. Once downloaded, the Windows AIK must be burned to a DVD and then installed (see Step 4).
The download page can be found here:
Windows Vista SP1 AIK:
http://www.microsoft.com/downloads/details.aspx?FamilyID=94bb6e34-d890-4932-81a5-5b50c657de08In order to install and use the Windows AIK, make sure you're running one of the supported operating systems:
- Windows 7 Family
- Windows Vista SP1 (or later)
- Windows XP SP3
- Windows XP SP2 with KB926044 installed
- Windows Server 2008
- Windows Server 2003 Service Pack 1 with KB926044 installed
- Windows Server 2003 Service Pack 2
Note: Depending on the operating system being used (XP SP2, for example), additional updates and/or programs may need to be installed (see Step 4).
- Highly Recommended: Microsoft Vista DVD (32-bit version)
- Image for Windows:
Image for Windows (IFW) must be installed on the system which you are using to create the build.
- WinBuilder:
WinBuilder is the program that actually builds the boot disc. From within WinBuilder, VistaPE itself can be downloaded. It is recommended that the most recent stable version of WinBuilder be used. As of this writing, the latest stable version is WinBuilder 078 SP6, released in January 2010. The procedure in this tutorial was tested using VistaPE v.12 (RC1b) and WinBuilder 078 SP6. The WinBuilder download can be found at the following links:
http://www.boot-land.net/forums/index.php?showforum=22 or www.winbuilder.net - Hard Drive Space:
Approximately 2GB of free space is required during the VistaPE build process. Installing Windows AIK requires up to 1.5GB of free space.
- Memory (RAM):
The target system requires a minimum of 256MB, with 512MB or more highly recommended. Note: To boot a build on a system with only 256MB of RAM requires creating the build with minimal programs.
Step 1: Download and Install WinBuilder
Download WinBuilder from a link below. The latest stable version is recommended.
http://www.boot-land.net/forums/index.php?showforum=22 or www.winbuilder.net
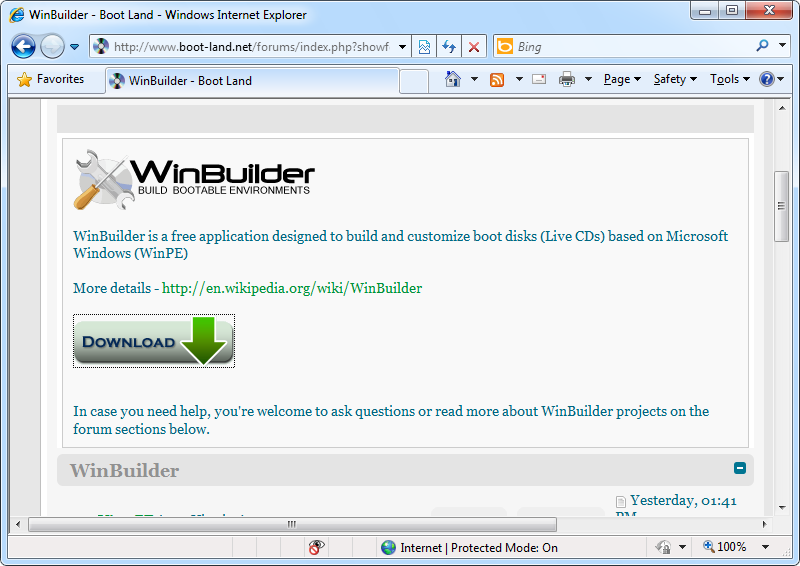
The WinBuilder download page will look similar to the screenshot below:
The WinBuilder download will be in the form of a zip file containing one file (WinBuilder.exe). Extract this file to the folder from where you want to run WinBuilder. It is recommended that you create a new folder in the root of a drive (C:\WinBuilder, D:\WinBuilder, etc.) and extract WinBuilder.exe there. It is also recommended that the path to the folder and folder name itself do NOT contain any spaces, as this can cause problems under some circumstances.
Step 2: Start WinBuilder and Download VistaPE
Start WinBuilder by executing WinBuilder.exe. If running from Windows Vista or Windows 7, WinBuilder will need to be Run as administrator. If UAC is enabled (the default), click Continue or Yes at the UAC prompt to allow WinBuilder to run. If WinBuilder does not properly elevate itself, you can do it manually by right-clicking WinBuilder.exe and choosing Run as administrator from the pop-up menu.
Since this is the first time WinBuilder has been run and no projects currently exist in the WinBuilder folder, it should go immediately to the Download Center screen as shown below.
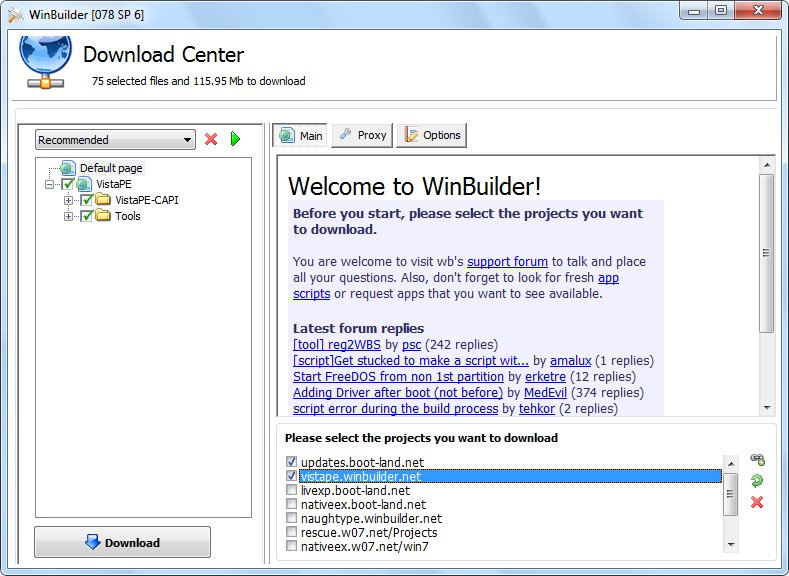
Select updates.boot-land.net and vistape.winbuilder.net in the bottom-right section (as shown above). For the first build you create, it's recommended that you leave Recommended selected in the drop down list and leave all other items as they are by default. Select the Download button to start downloading VistaPE. The screenshot below shows the download in progress:
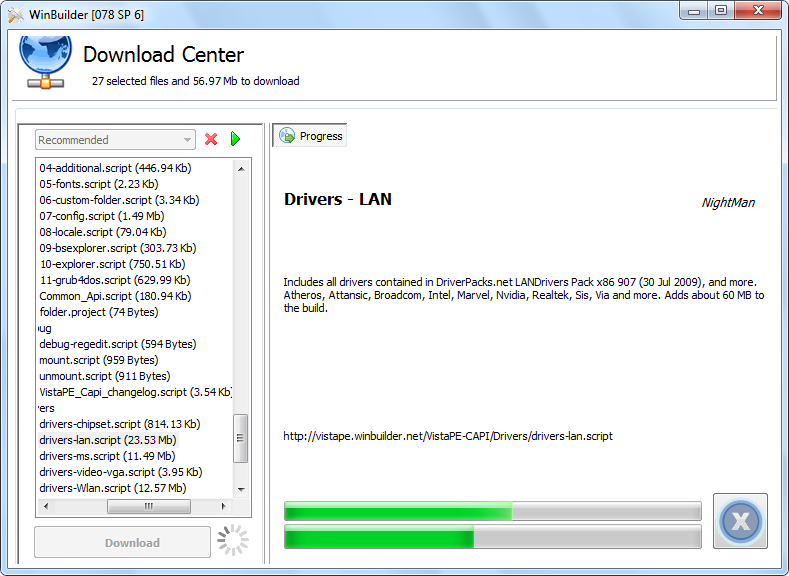
If you get one or more messages stating that a file cannot be found or downloaded, acknowledge the message and let the download complete with the missing file(s). Then select Download from the main WinBuilder screen, and choose Download again on the Download Center screen. Doing this should cause WinBuilder to download just the missing file(s) so that you now have a complete VistaPE installation.
Note: If you want to start the VistaPE download over again from the beginning, close WinBuilder, delete everything in the WinBuilder folder except WinBuilder.exe, and then run WinBuilder again to start over.
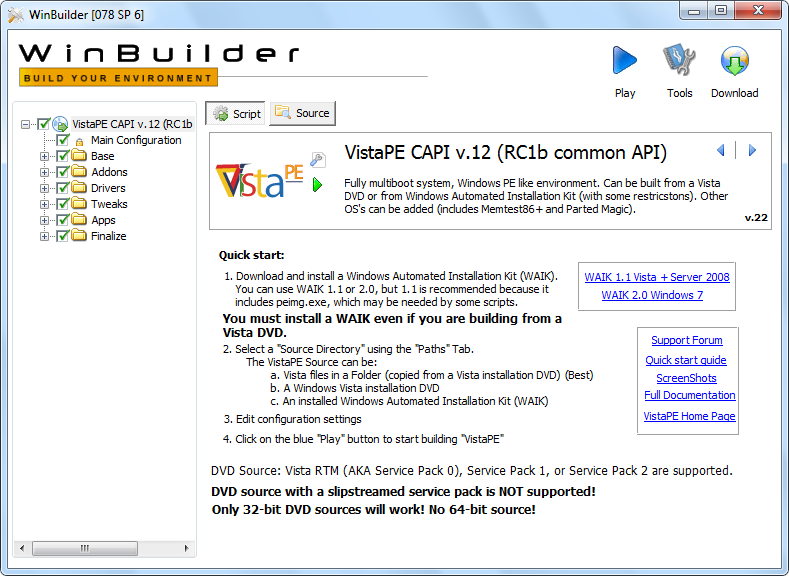
When finished with the VistaPE download, the main WinBuilder screen will look as shown below:
Step 3: Install the IFW files in VistaPE
IFW includes a utility (bartpe.exe) that will install the files required to include IFW on the VistaPE boot disc. This file is located in the IFW installation folder (C:\Program Files\TeraByte Unlimited\Image for Windows\V2, by default). Successfully using this utility requires that the VistaPE project has already been downloaded into WinBuilder (as outlined in Step 2 above).
If WinBuilder is currently running, exit it before proceeding.
Start the bartpe.exe utility and select the VistaPE radio button. In the PE Builder Location field, browse to the WinBuilder folder and select that folder. For example, if WinBuilder is installed in the C:\WinBuilder folder, then the PE Builder Location field should contain C:\WinBuilder. In the Product Key fields, type in (or copy/paste) your registered name and IFW product key. To start IFW automatically on booting the VistaPE disc, select the Run Image for Windows automatically check box (this option can be also be selected or unselected later from within WinBuilder). If you plan to place the VistaPE build onto a UFD (or other writable media), select the Preserve key for writable media option. Additionally, you can select whether or not to include TBIView, TBIMount, and the TeraByte OSD Tool (these programs must be installed to be selected).
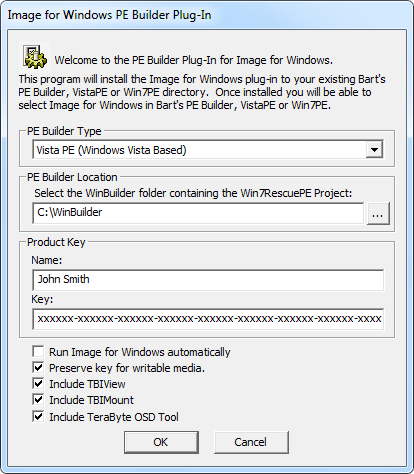
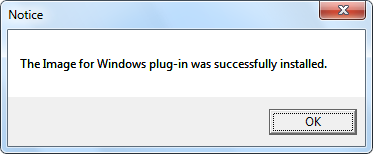
Press OK to complete the setup. When the utility completes, you should get a success message.
Note: If you are using Windows 7, you may have a Program Compatibility Assistant window displayed when you exit the IFW PE Builder utility (bartpe.exe). If this happens, you can safely select the This program installed correctly option.
There will now be a TeraByte folder under the Projects\VistaPE-CAPI\Apps folder within the WinBuilder folder. The TeraByte folder will contain multiple files (depending on options selected), including ifw.script, as shown below:

Run the WinBuilder program. You should now be able to select the Image for Windows script under Apps >> TeraByte section and then be able to select or unselect the checkbox options available:
- Start IFW Automatically
- Add IFW Shortcut To Desktop
- Add IFW Shortcut To Quick Launch
- Run from RAM (boot.wim) - Recommended
You can also select which optional programs to include (if selected when plug-in was created).
These options can be changed as desired for each build of the boot disc. Note: In order to ensure that IFW is correctly accessible in the build, it's recommended to leave the Run from RAM... option selected.

Note: It is not necessary to run the IFW PE Builder utility (bartpe.exe) before every build. That is only required when you want to upgrade the IFW version, although you could also do that by just copying the file imagew.exe from the IFW installation folder to the TeraByte folder under WinBuilder. If desired, you can also edit the ifw.ini file within the TeraByte folder to change the default IFW settings before a build.
Step 4: Install Windows AIK
The Windows AIK is required to build the VistaPE boot disc. Using the Windows Vista SP1 AIK is recommended. The download page can be found here:
Windows Vista SP1 AIK: http://www.microsoft.com/downloads/details.aspx?FamilyID=94bb6e34-d890-4932-81a5-5b50c657de08
Note: If you are installing on XP, please make sure your system will support it (see the Requirements section above).
The Windows AIK download from Microsoft will be an ISO file, approximately 1.3GB in size. Once downloaded, burn the ISO file to a DVD with a utility such as BurnCDCC. This utility is included with IFW and can also be downloaded from TeraByte Unlimited at the link below:
https://www.terabyteunlimited.com/downloads-free-software.htm
To start the install, insert the DVD and wait for the Windows AIK welcome screen to appear. If the DVD doesn't autorun when inserted, you can open the DVD drive in an Explorer window and then double-click startcd.exe. Be sure to note the installation requirements on the welcome screen, which specify which versions of Windows (and Service Pack levels) are supported by Windows AIK.

Select Windows AIK Setup from the welcome screen menu. After some initialization and the license agreement screen, the following dialog will come up:

The defaults shown above will work fine and it's recommended to keep them. If you are unsure if there is enough free space on the installation drive, check the required disk space before proceeding by using the Disk Cost button. When ready, click Next to start the install. At completion, the following screen will appear:
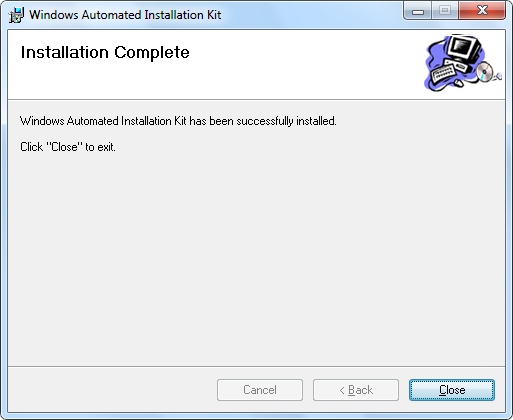
Note: The Windows AIK requires both the .NET Framework and MSXML 6.0 to be installed. If they are not already installed on the system, Windows AIK Setup will detect this and request that you install either/both of these items first. Both are available to install from the same DVD and appear on the welcome screen menu as .NET Framework Setup and MSXML 6.0 Setup. Windows XP (in particular) will usually require the installation of these programs.
Step 5: Configure VistaPE Before Building the Boot Disc
Run WinBuilder (if it's not still running from Step 3). It should be on the initial screen and show the VistaPE project.
With the VistaPE CAPI... item highlighted in the left pane, click on the Source button at the top. The Paths configuration screen will now be visible as shown below:
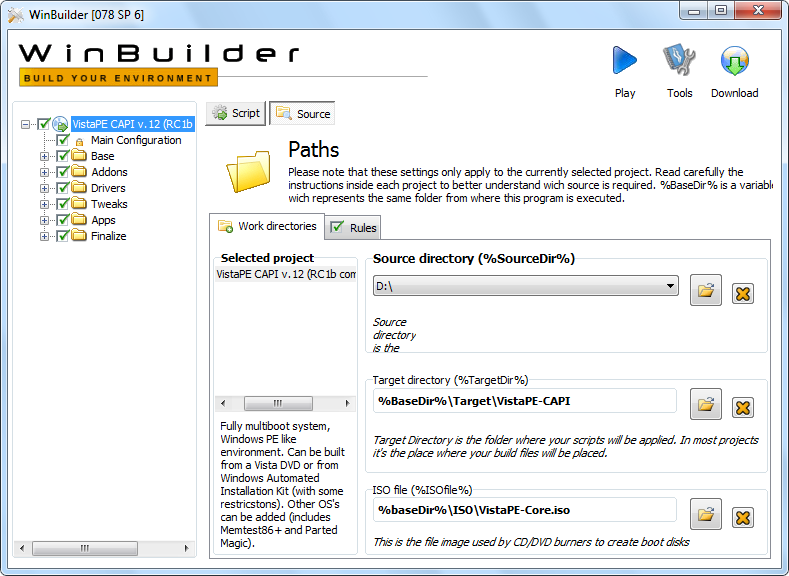
The key item on this screen is the Source directory, which tells VistaPE where to find the source for building the boot disc. The Target directory and ISO file items can be left as they are by default.
If you are using a Vista DVD as the source, insert the DVD into a DVD drive and use the "browse" button in the Source directory dialog to select the drive letter for the Vista DVD. In the screenshot above, the D:\ drive is the location of the Vista DVD. For convenience and a somewhat faster build, you can also copy the contents of the Vista DVD to a folder of your choice on the hard drive and then specify that location for the Source directory setting. For example, if you copy the contents of the DVD to the folder C:\VistaDVD, then that location should be specified for the Source directory setting.
IMPORTANT: If you are using the Windows AIK as the source, select the Windows AIK installation folder:

Next, select the Script button at the top and then select Main Configuration in the left pane. This brings up the Main Configuration screen for VistaPE as shown below:
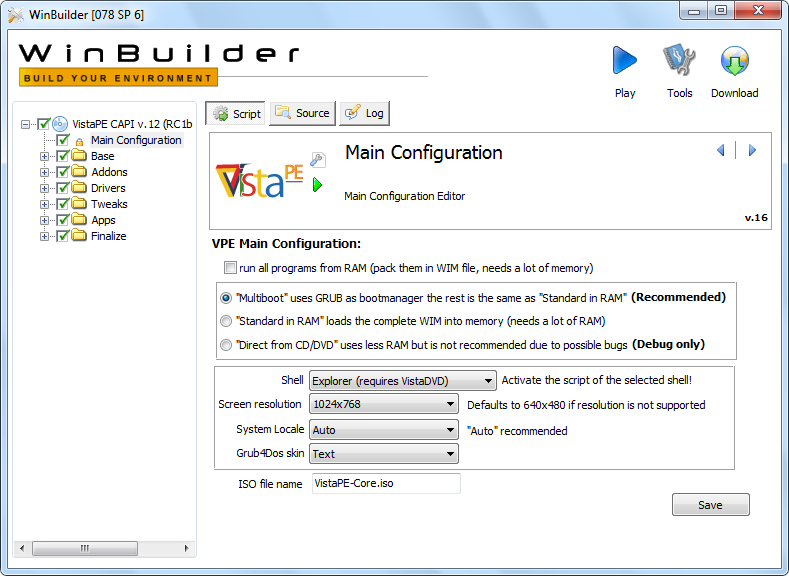
While the settings shown above are recommended for the first build, it may be necessary to make a few changes:
- Make sure the Screen resolution is set to 1024x768 or higher (IFW will not fit on the screen at lower resolutions).
- IMPORTANT: If you are using the Windows AIK as the source for the build, change the Shell drop-down selection to BS Explorer (best if no Vista DVD).

If made any changes, click the Save button to save them.
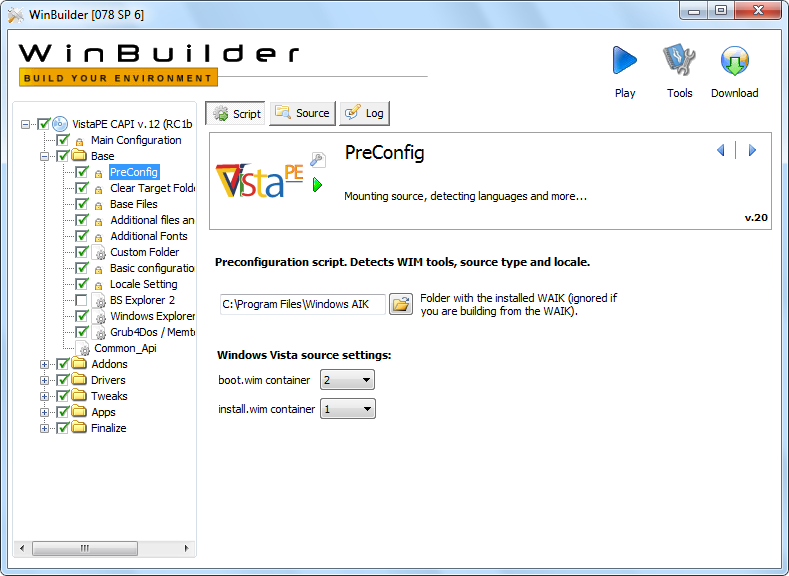
Expand the Base section in the left pane and highlight the PreConfig item. Verify the path to the Windows AIK installation is correct. By default, this setting should be correct unless you installed the Windows AIK to a non-default location. If necessary, browse to the correct folder to set the correct path.
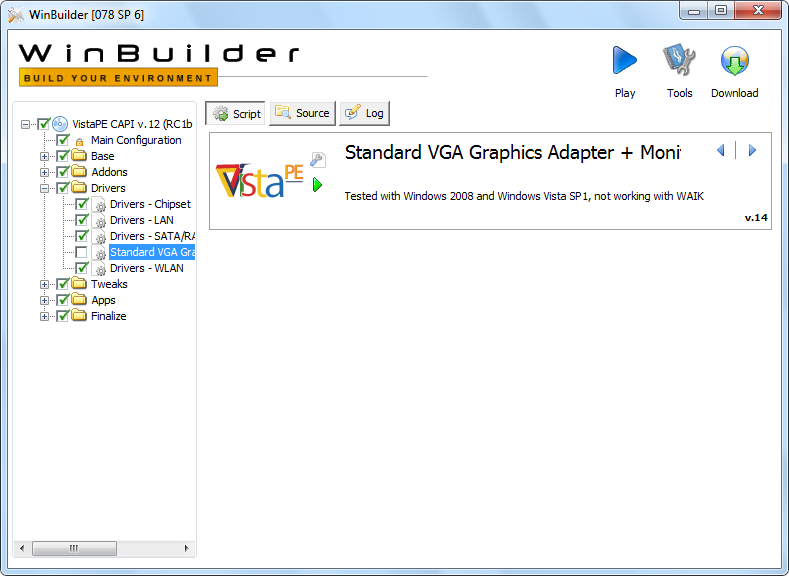
Expand the Drivers section in the left pane and unselect the Standard VGA Graphics Adaptor... item. Note: On some systems, the boot disc may hang during the initialization process if this item is left enabled.
For the first build, you can unselect (uncheck) most of the included Apps scripts (these scripts are not required for the build). Unselect:
- File Tasks
- HD Tasks
- Security
- Supplementary
- System
Note: You may wish to keep the Apps >> File Tasks >> a43 script selected if you plan to use it for file management.

Important: If you are using the Windows AIK as the source for the build, some additional changes are required.
Note: If you are using a Vista DVD as the source, these changes are not required. Skip to Step 6.
Expand the Base section in the left pane.
Select the BS Explorer 2 item. Select (check) the BS Explorer 2 item. Check the Run from RAM (boot.wim or RAMdisk) option.

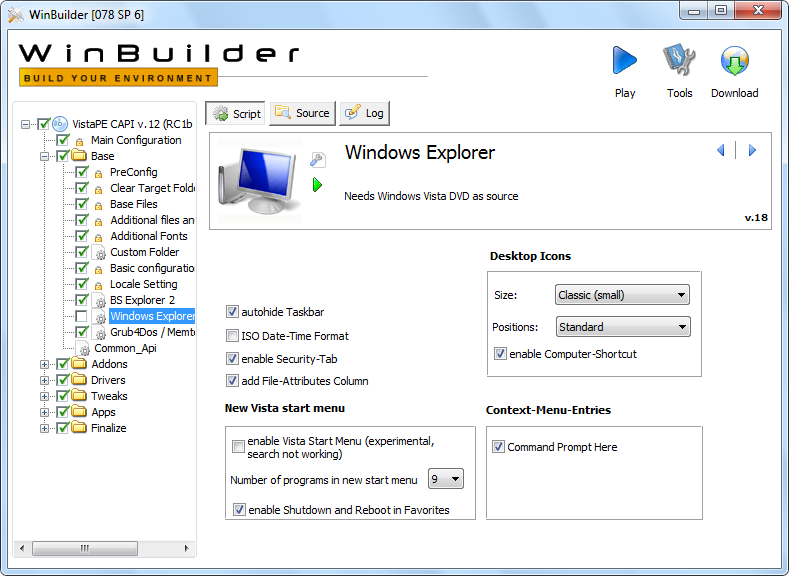
Unselect (uncheck) the Windows Explorer item.
Select (highlight) the Additional files and drivers item. Unselect the following options:
- Extended PnP adds some extra tools to better detect and load drivers (needs Vista DVD)
- Add extra files needed for IE7 and some other programs (needs Vista DVD)
- Volume Shadow Service (VSS) (needs Vista DVD)
Note: While it's not strictly necessary to unselect these scripts, leaving them selected may cause build warnings.

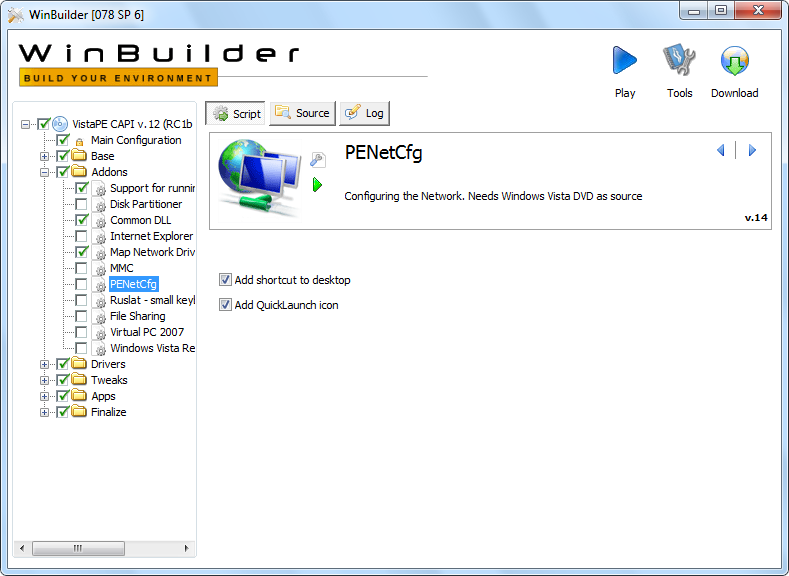
Expand the Addons section. Unselect (uncheck) the following items (they require a Vista DVD source):
- PENetCfg
- File Sharing
- Windows Vista Recovery Environment
Step 6: Configure IFW
To ensure that IFW will be included on the boot disc, expand the Apps >> TeraByte section in the left pane and verify that the Image for Windows item is checked (it should be by default). When the Image for Windows item is highlighted, the IFW configuration screen will be displayed in the right pane. These options can be set to your preferences for each build. A screenshot of the IFW configuration screen is shown below (and also in Step 3 above):

For your first build, it's recommended to leave the options set a their default values.
Note: For the best results with a variety of boot media (ISO, CD/DVD, UFD, etc.), please leave the Run from RAM... option selected.
Step 7: Build the VistaPE Boot Disc (the ISO file)
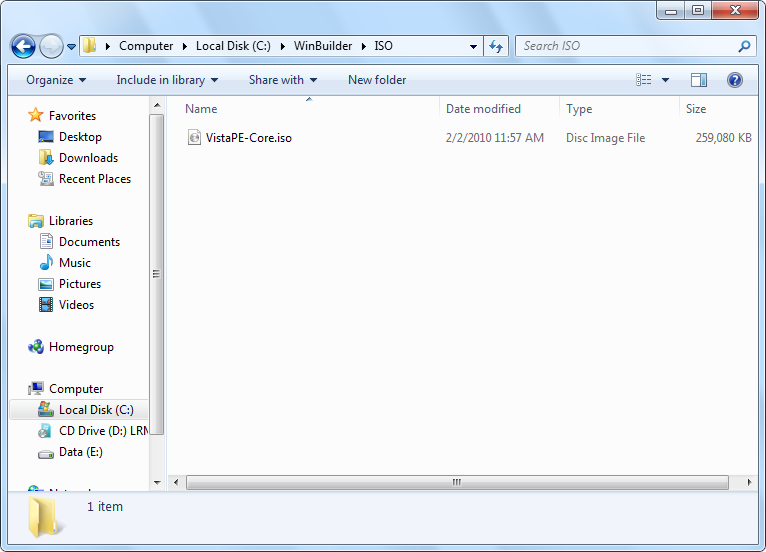
This step will build the boot disc and create the VistaPE ISO file, which will be created (by default) in the ISO folder under WinBuilder, and will be named VistaPE-Core.iso. Please note that creating VistaPE on a USB flash drive (UFD) will require some additional steps after this one and will be covered in Step 8 below.
Highlight the VistaPE CAPI... item at the top of the left pane and click the Play button at the top-right of the screen (the blue triangle) to start the build. The VistaPE main screen is shown below as a reference:
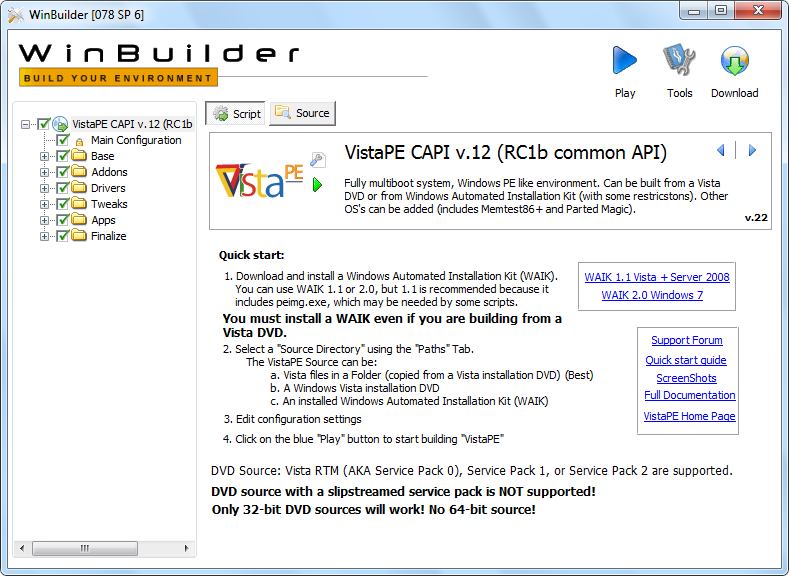
The screenshot below shows the build in progress:
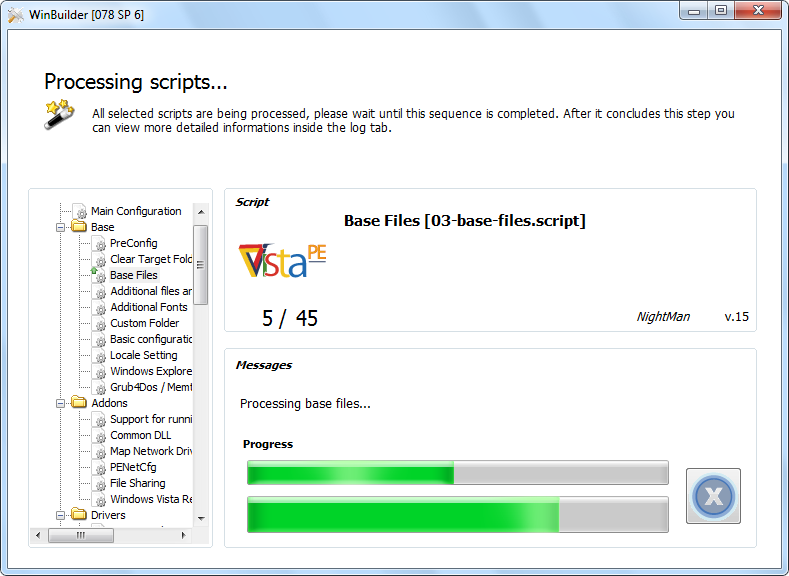
When the build completes, WinBuilder will return to the normal VistaPE screen.
If you are creating a UFD rather than a CD/DVD, you can skip to Step 8 at this point. Otherwise, continue below to create the CD/DVD.
The file VistaPE-Core.iso will be created in the ISO folder as shown below. The actual size of the file will depend on the configuration options chosen, as well as the scripts included in the build.
The ISO file can be burned to CD/DVD by using a CD/DVD burner application capable of burning ISO files. As mentioned previously, the TeraByte Unlimited free utility BurnCDCC is ideal for this purpose and is included with IFW. It can be downloaded from TeraByte Unlimited at the following link: https://www.terabyteunlimited.com/downloads-free-software.htm
Note: If you are using Windows 7, you can also burn the ISO file to a CD/DVD by right-clicking on the file and selecting Burn disc image from the pop-up menu.
Step 8 (optional): Create the VistaPE Boot Disc as a USB Flash Drive (UFD)
Once you have completed Steps 1 through 7 above, you are now ready to create a bootable UFD.
Expand the Finalize section in the left pane and then highlight the Create ISO/CD/USB item. If the Script button on the right is not already pressed (it should be), click it. You should see the screen shown below:

Plug in the UFD (if not already plugged in) and determine its Windows drive letter. In the appropriate box in the screen above, use the browse button to select the root directory of the UFD (the example above has it set to F:\).
Next, click the script's Make USB boot device button to run it.
Note: If you have previously created a VistaPE UFD and just need to update the files, you can use the Copy files (only) button instead. The files on the selected UFD will be updated with those of the current build. Reformatting and configuration of the UFD is not necessary.

Click OK when asked to format the UFD.

The HP USB Disk Storage Format Tool will run.
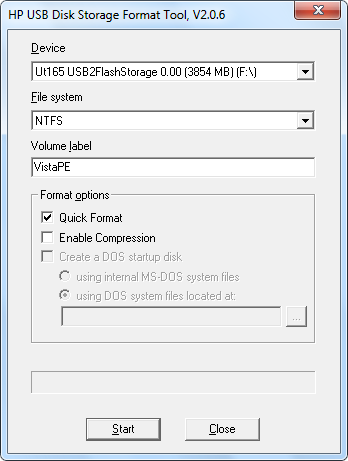
Make sure the UFD is selected in the Device drop-down box. Important: Be very careful to select the correct drive. The formatting procedure will erase all data on the selected drive.
Select the format type you want (FAT32 or NTFS) using the File system drop-down box.
Enter a label for the UFD. In this example, the label has been set to VistaPE.
Next, check the Quick Format box and then click Start to format the UFD.
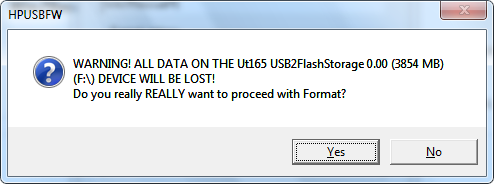
Verify all information is correct and then click Yes on the warning dialog.
When the format completes, a summary screen will be displayed as shown below:
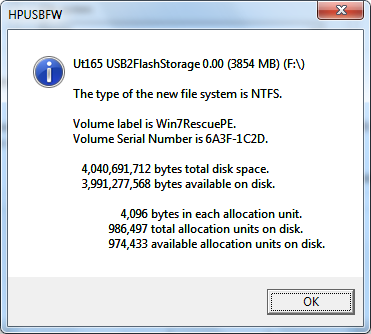
Click OK, then Close the HP Format Tool dialog to continue the process of setting up the UFD.
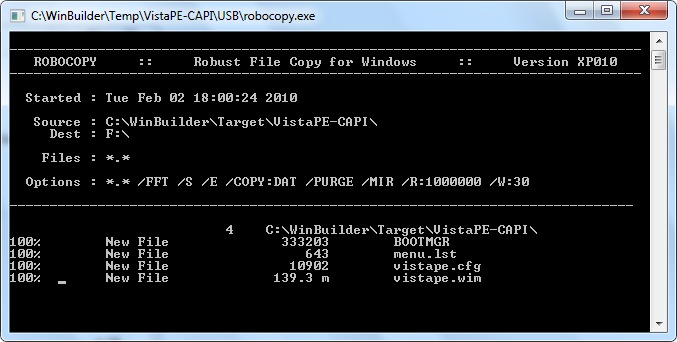
The file copy should now take place:
Next, Grub4DOS will be setup on the UFD. Click the Disk radio button and then select the UFD from the drop-down box. Important: Be very careful to select the correct drive. You should be able to tell which drive is the UFD by the size. Click the Refresh button for the Part List drop-down box and then select Whole disk (MBR) from it. Check the Don't search floppy option. Finally, click the Install button.
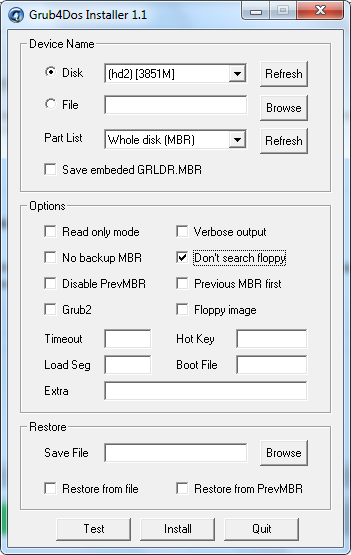
If everything went correctly, you should see the following success message:

Press ENTER to close the window and then click the Quit button to close the Grub4DOS Installer.
Press OK on the All Done box (or wait for it to timeout). WinBuilder will return to the main VistaPE screen.
The UFD device is now ready to boot. You will need to set the UFD as the boot device in order to boot from it. Typically this can be done by either going into the BIOS setup and changing the boot order, or by selecting the UFD device from a menu of boot devices that can be brought up (on some systems) at boot time by pressing a hot key (F8 or F11, for example).
The VistaPE Desktop:
Booting and initializing VistaPE will typically take several minutes, depending on the system, how the boot disc was configured, and the type of the booting device (CD, UFD, etc.). A UFD will usually boot faster than a CD/DVD on most newer systems.
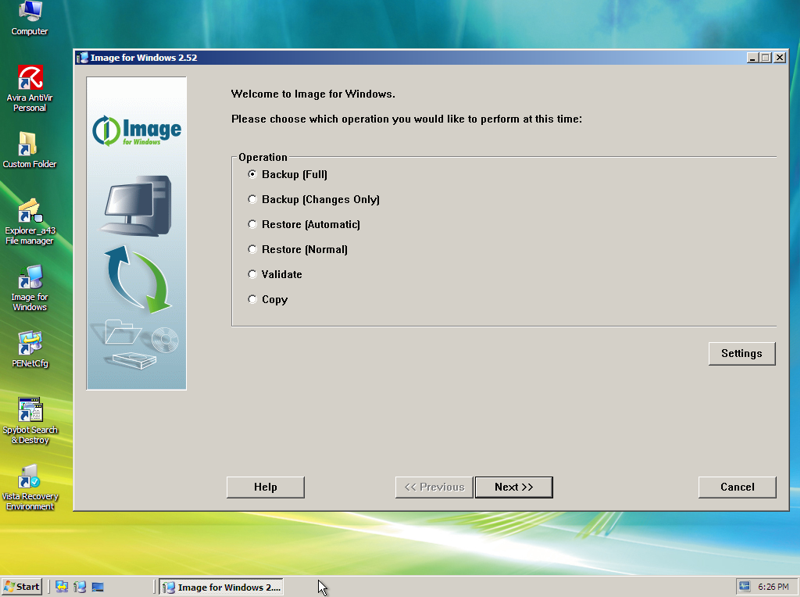
The VistaPE desktop will look similar to the screenshot below, depending on the options selected in the VistaPE configuration (this example is using the Explorer shell). If included, the PENetCfg utility (shown on desktop below) can be used to configure the network and map network drives.
Additional Notes
The VistaPE project seems to change fairly often. As a result, builds across different versions are not always consistent (what worked properly in one version may not in another). If you create a build that works well on your computer, it's a good idea to save the setup so you can use it again later (to update to a newer version of IFW, for example).
During the VistaPE startup process, the VistaPE Loader program may pause to allow you to skip the extended hardware detection and network installation:
Please note that if the normal detection correctly loads the needed drivers for you system, you can safely skip this. Also, on some computers, installing/processing the extra drivers may cause some hardware support to be lost or may even cause a crash (BSOD). If this happens, just reboot and skip it.
As of the time of this writing, using the Windows AIK as the source for the build seems to be more problematic than using a Vista DVD (it's highly recommended to use a Vista DVD as the source, if possible). Please note the following:
- Booting from a CD/DVD may work better than from a UFD.
- External drives (a USB drive, for example) may need to be connected before VistaPE is booted. Drives connected after VistaPE has booted may not be detected.
- USB keyboard and/or mouse support may not function correctly.
If you have problems with creating a usable VistaPE build, you may want to try a Win7RescuePE build.
